Worldwide Accounting Documentation
Welcome to the Worldwide Accounting Software user manual. This comprehensive guide will help you navigate and utilize all features of our accounting platform.
Powerful Accounting Made Simple
Worldwide Accounting is designed for businesses of all sizes, offering robust accounting management tools with an intuitive interface.
- Complete accounting management suite
- Company Audit, Accounting Reports, i.e. Trial Balance, Audit Report, Balance Sheet etc.
- Real-time reporting and analytics
- Customizable to your business needs

Create Your Account
Learn how to register for a new account and set up your company profile.
Configure Your System
Step-by-step instructions for setting up your chart of accounts and preferences.
Check the VAT settings
Customize the VAT Percentage according to the country or Off the VAT at all.
Quick Start Guide
Complete Your Registration
Sign up and verify your email address to activate your account.
Set Up Your Company
Enter your business information, currency preferences
Configure Chart of Accounts
Customize your chart of accounts to match your business structure.
Add Your First Transactions from Invoice
Start recording income and expenses to get familiar with the system.
Accounting Overview
Monitor your business performance with customizable dashboards and widgets.
Invoice Management
Create, send, and track professional invoices with automated reminders.
Expense Tracking
Record and categorize business expenses with receipt attachment.
Accounting Reporting
Generate profit & loss, balance sheet, and custom accounting reports.
Purchase Order Management
Create and manage purchase orders to track inventory purchases from suppliers.
Supplier Invoices
Record and track invoices received from suppliers for goods and services.
Product Catalog
Manage your product inventory, pricing, and stock levels across warehouses.
Customer Quotations
Create professional price quotes and proposals for potential customers.
Customer Management
Manage customer relationships, track interactions, and maintain complete customer profiles.
Sales Order Processing
Manage customer orders from receipt through fulfillment and delivery.
Inventory Control
Track stock levels, movements, and adjustments across multiple warehouses.
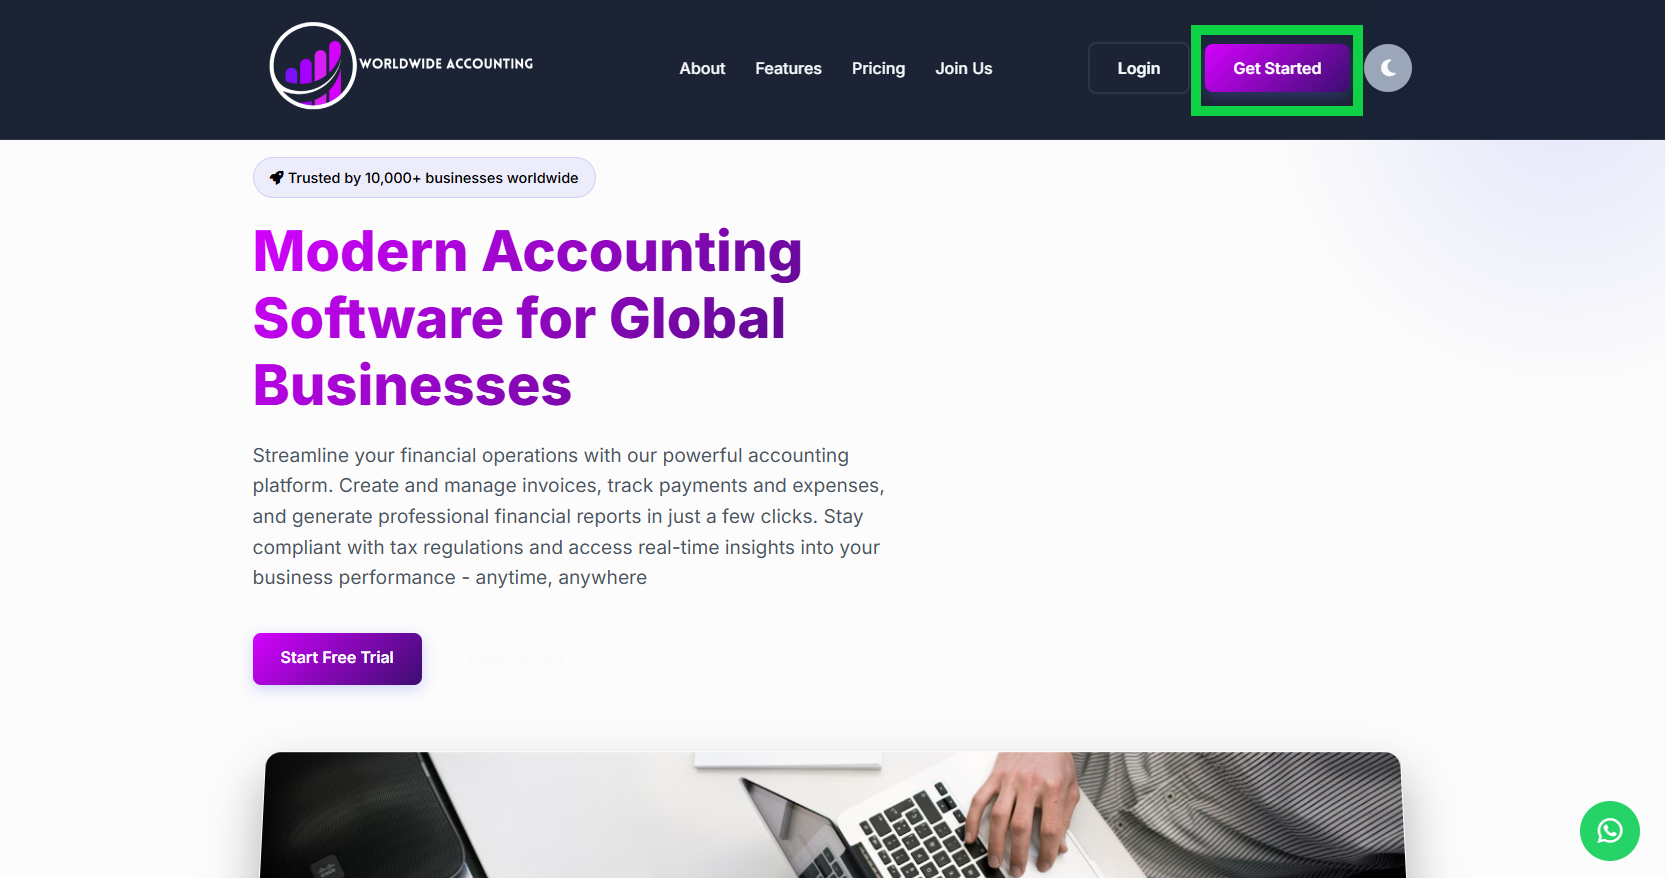
Visit the Worldwide Accounting website link https://worldwideaccounting.online, and click on the button "Get Started" and you will be redirected to the Register page Step 1.
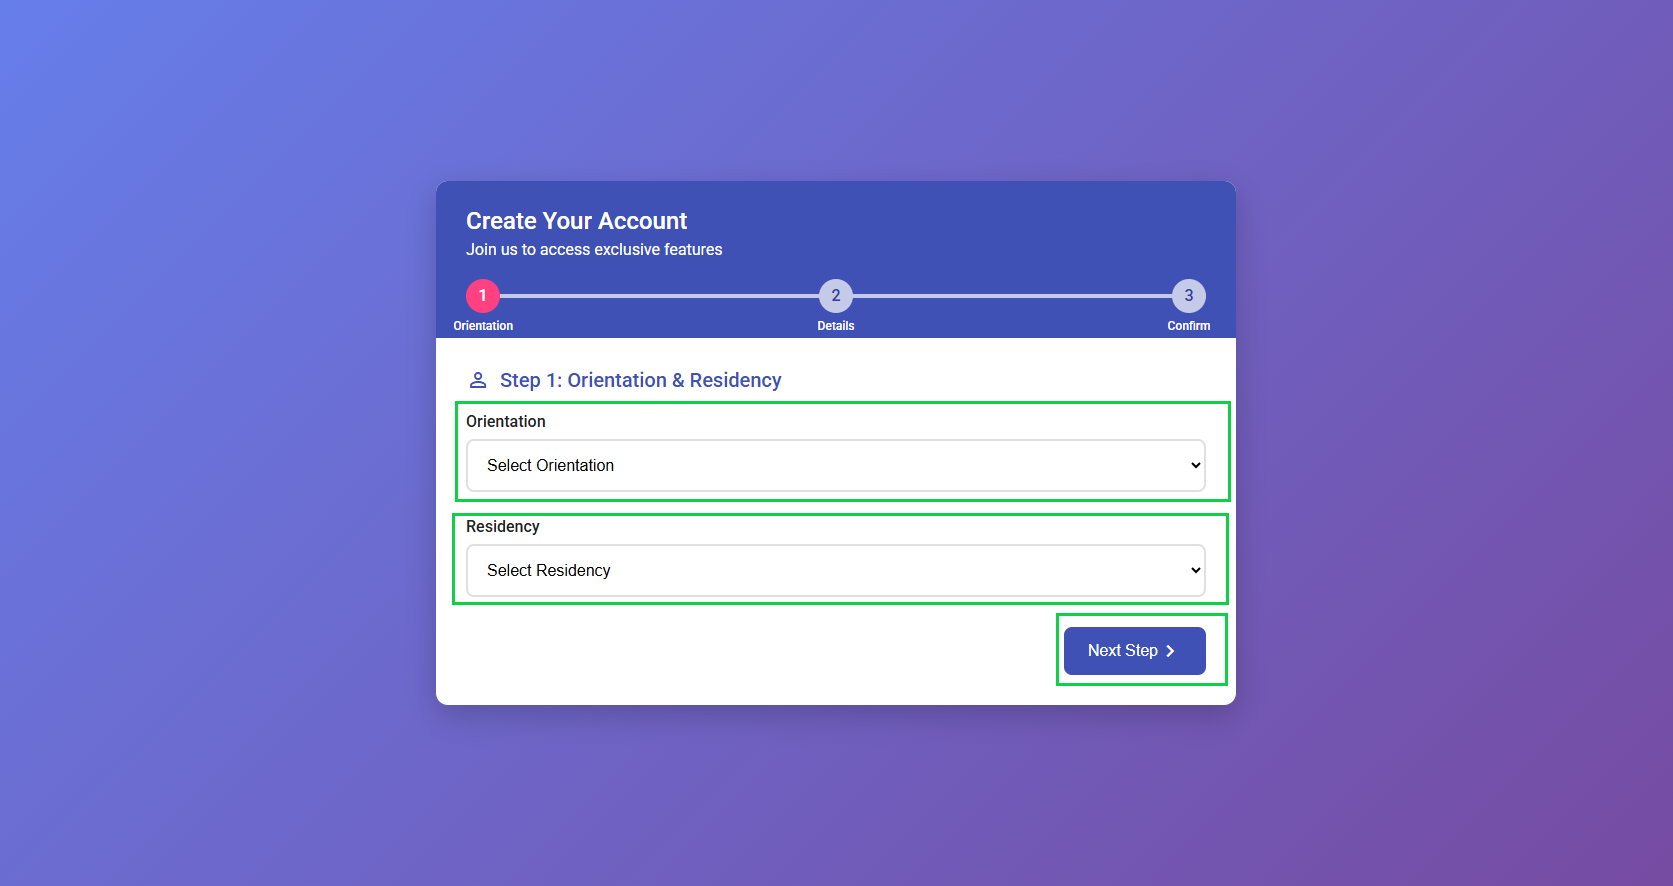
Select the Orientation of the User, Individual or Company from Orientation dropdown and then select Residency as Resident or National from Residency dropdown. Click on "Next" button, it will be redirected to the Step 2.
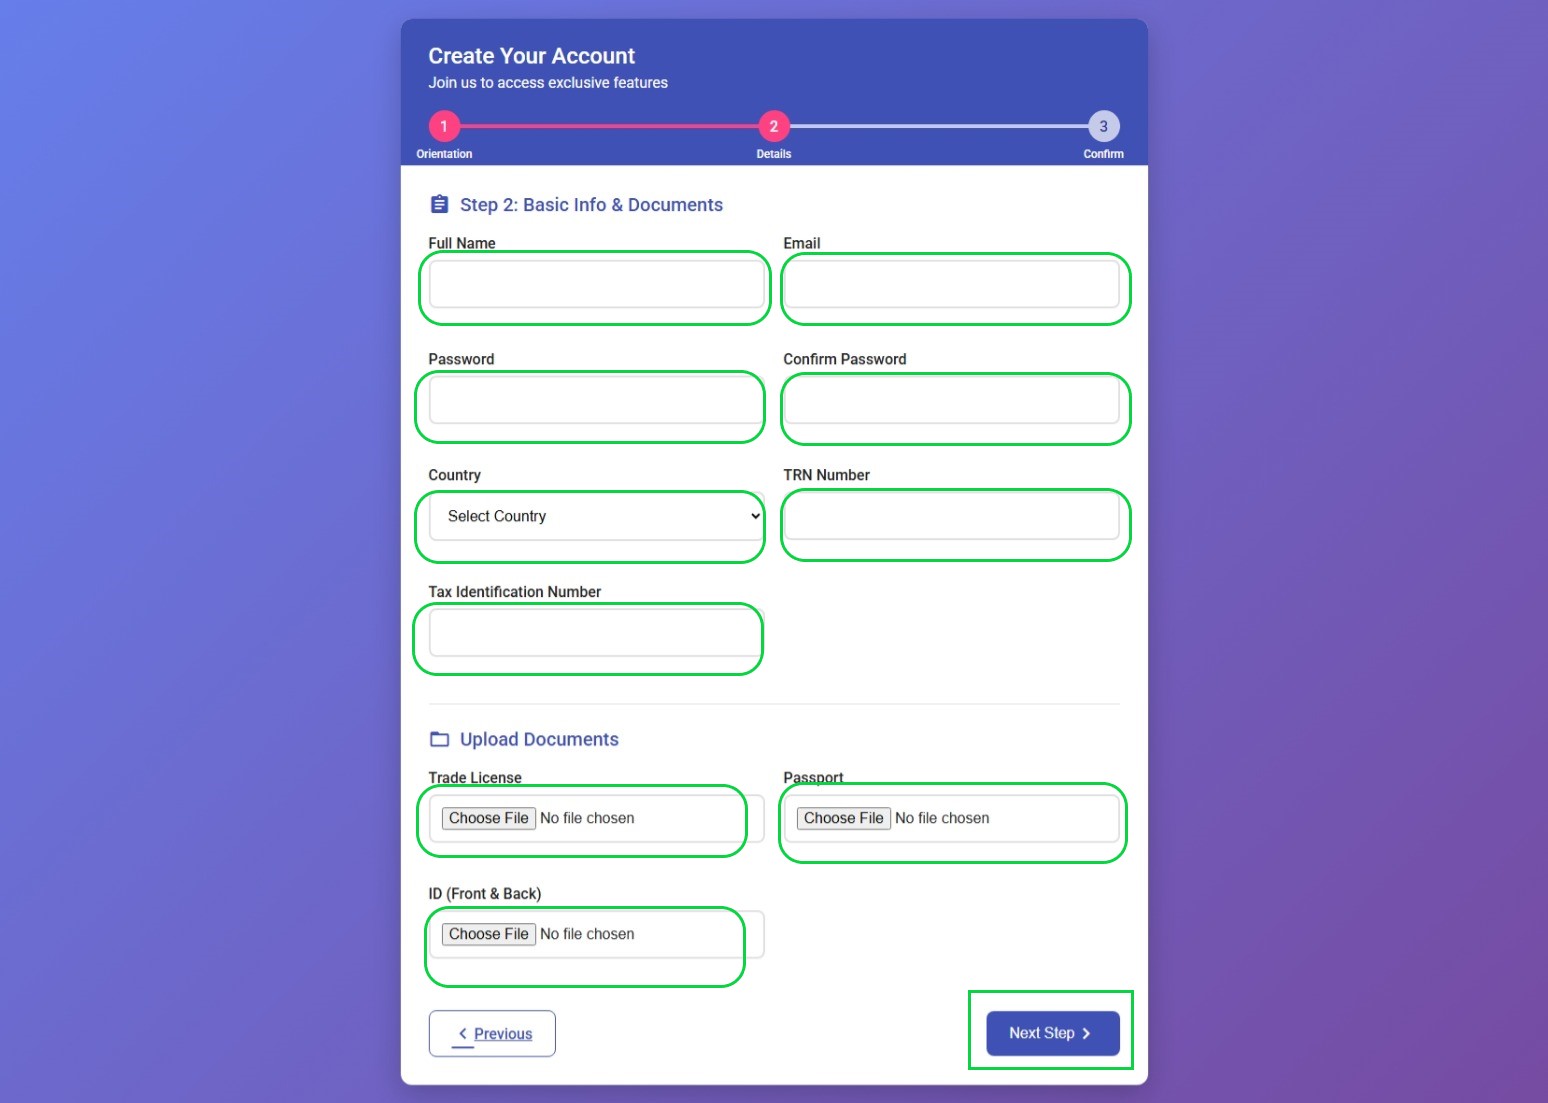
Fill out all the basic information and upload the required documents, if the user is individual and residency is national then he will only upload the ID (Front & Back both in one file), if the user is individual then he will upload the passport and ID (Front & Back both in one file), if the user orientation is company and residency is resident, then he wil upload the Trade License, Passport and ID (Front & Back both in one file), and if the company residency is national, then user will upload the ID (Front & Back both in one file), and Trading License. Click on "Next" button, it will be redirected to the Step 3.
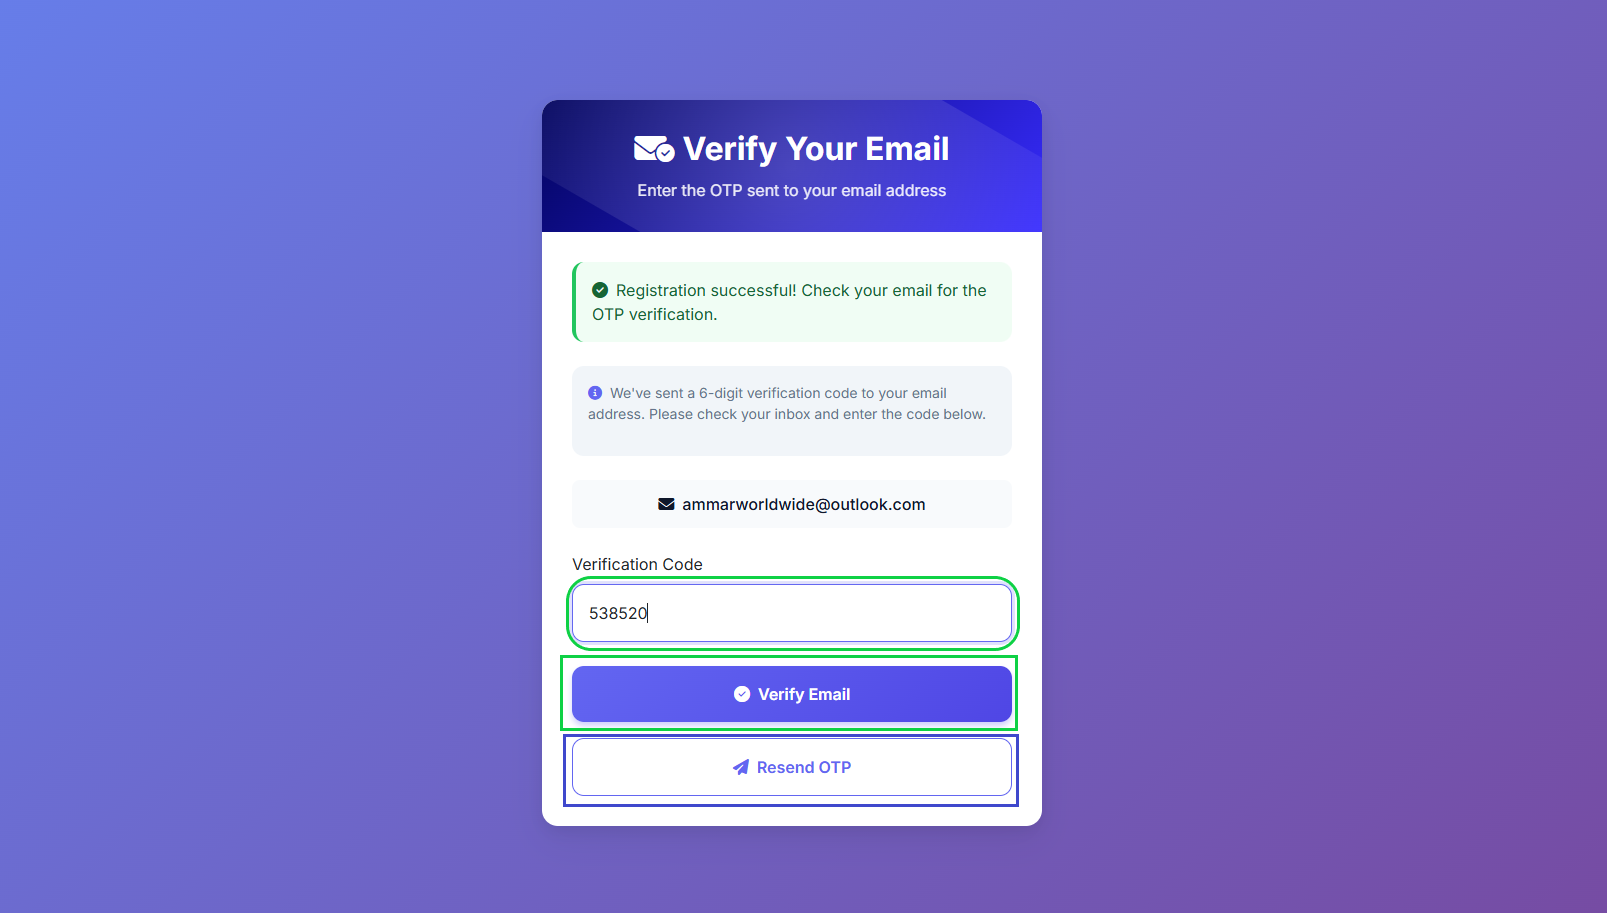
In this step check the filled information carefully, if there is something wrong typed you can go back and re-edit and submit again. If the user check the information including the documents uploaded, finally he can "Complete Registration" button, it will redirect to the OTP page, it will send the OTP to the given valid email id, after receiving the OTP in the email, the user can fill out OTP and click on "Verify Email" button, if user didn't receive the OPT, he can resend it again by clicking the button "Resend OTP".
After succefully registration, it will auto login and will be redirected to the Dashboard.
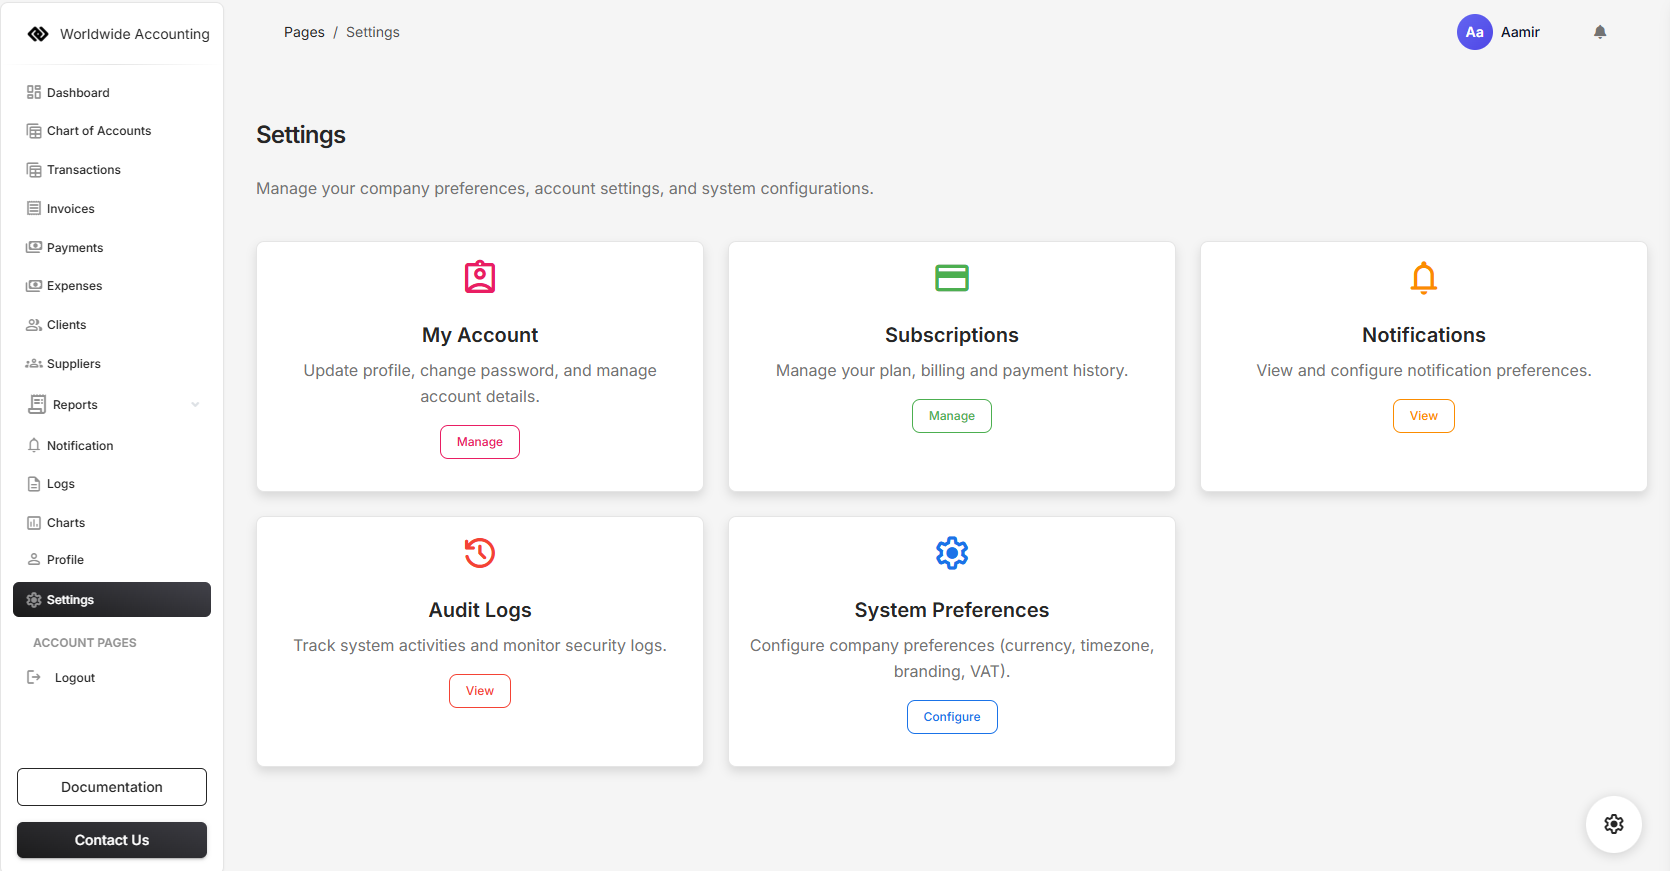
Initial setup has two modules to be configure carefully, which are My Account, and System Preferences. In My Account section user can change/update the profile settings, including password, and company details. While in Preferences, user can configure the settings of the VAT, Currency, Time and Date Format. etc.
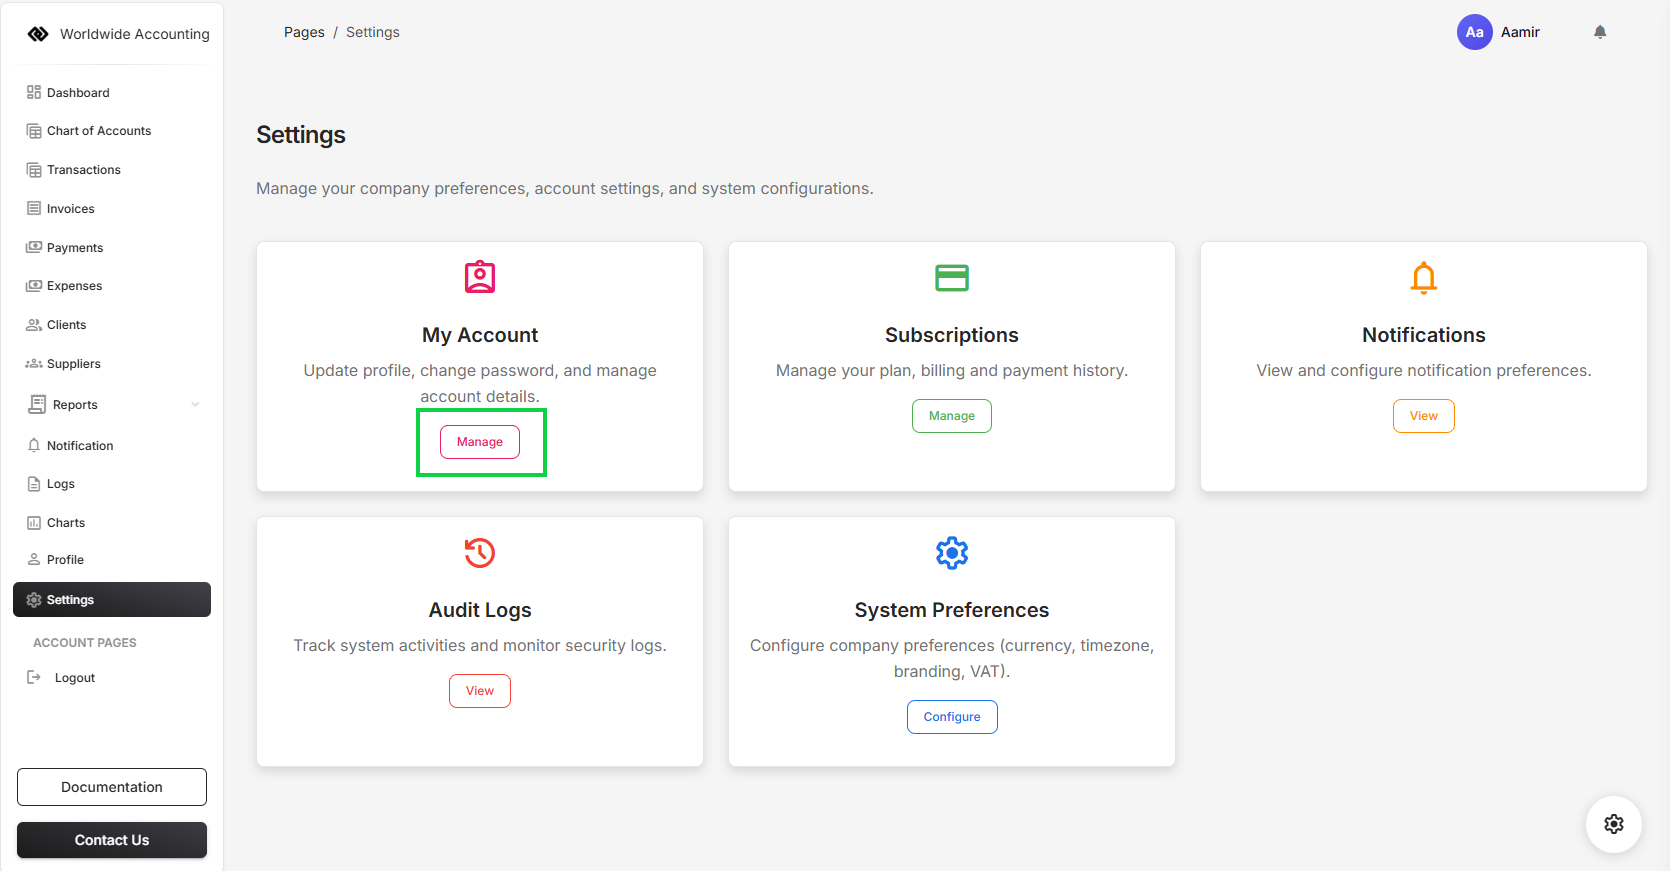
After clicking the Manage button in Account module, it will be redirected to the Profile Section, where you can edit the profile settings.
The Profile is the collective module and it is very important part of the accounting software, the user should fill it with high priority, because the invoices will be builted with these basic information, for example if the company is engaged in taxable business activities, the user should fill the TRN and Tax identification Number details, then it will be showing in the invoice and transactions including the reports.
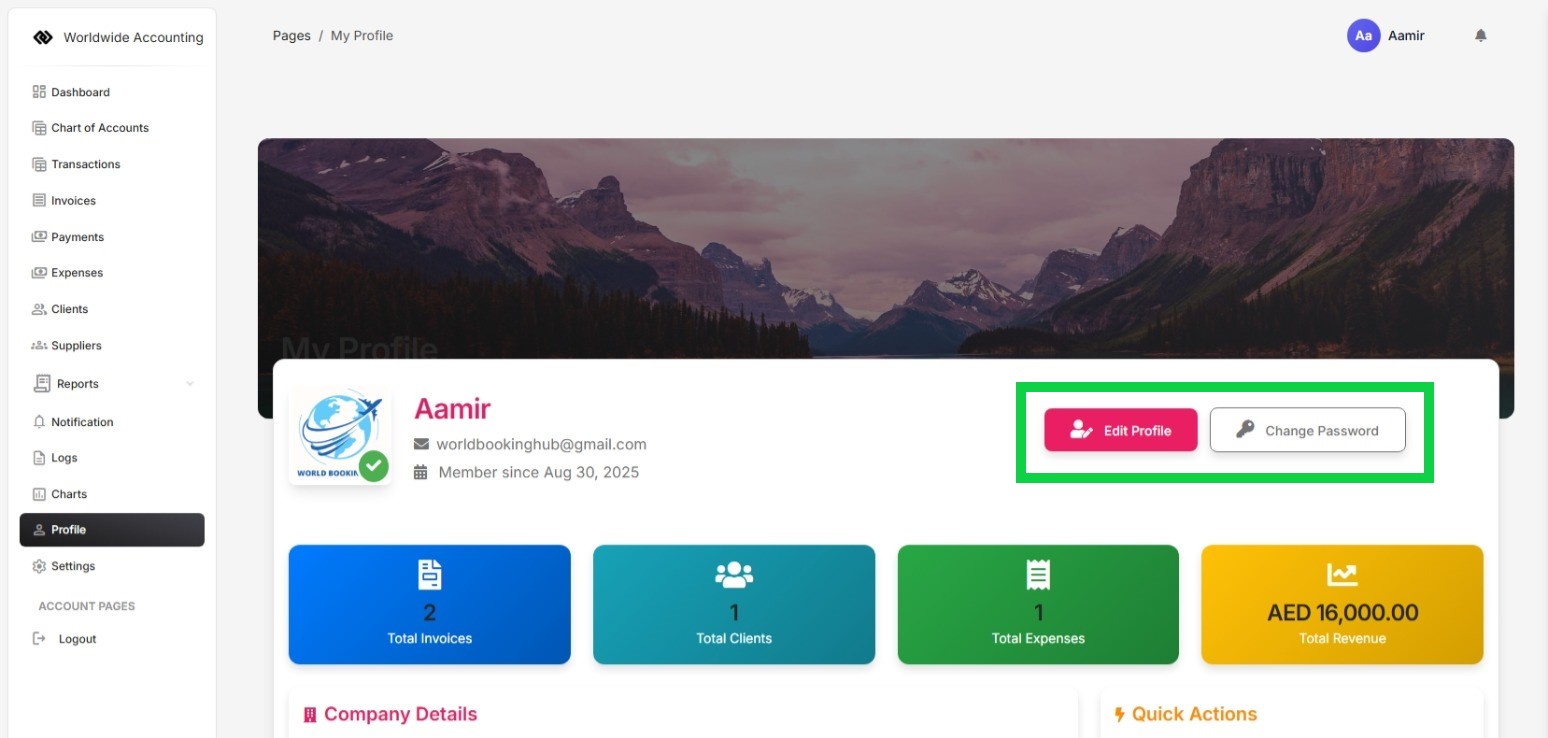
The profile settings include the avatar, Name, Email, Company Details [Orientation, Residency, Address, Country, TRN Number, Tax Identification Number, Website, Phone, Manager Name, and Manager Email]. After filling the inputs user can click on the Update Profile button.

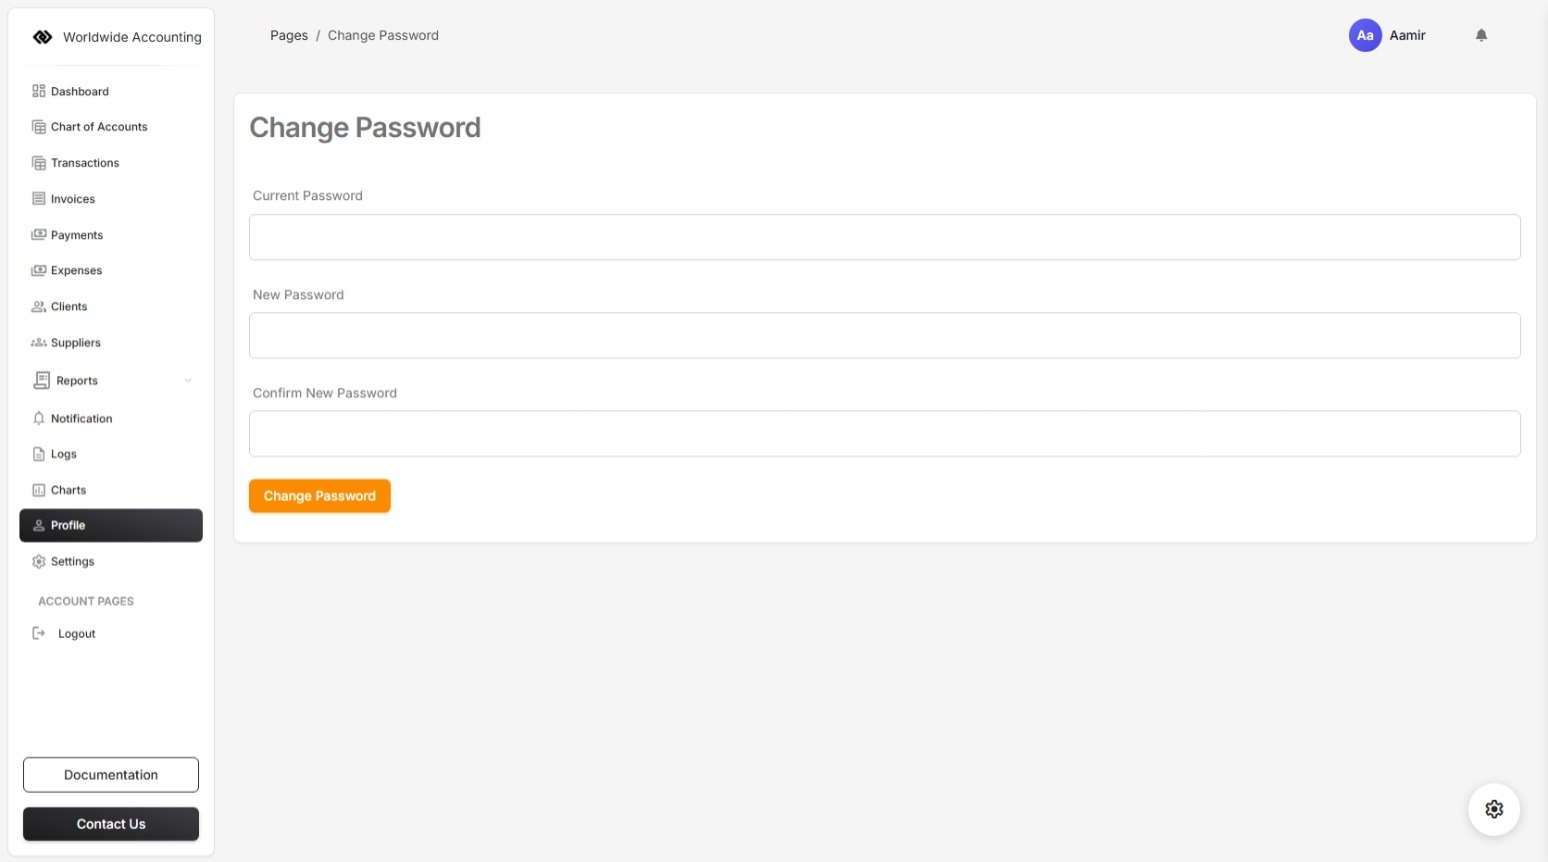
In the same profile module the user can change the password by clicking the button Change Password, it will open a form that will include the current password and new password fields. After confirming the Current and new password user can click on the button Chanage Password, it will successfully change the password of the current user.
In system preferences the settings include currency, timezone, and Date Format, Language, Number Format, Invoice settings and VAT settings.
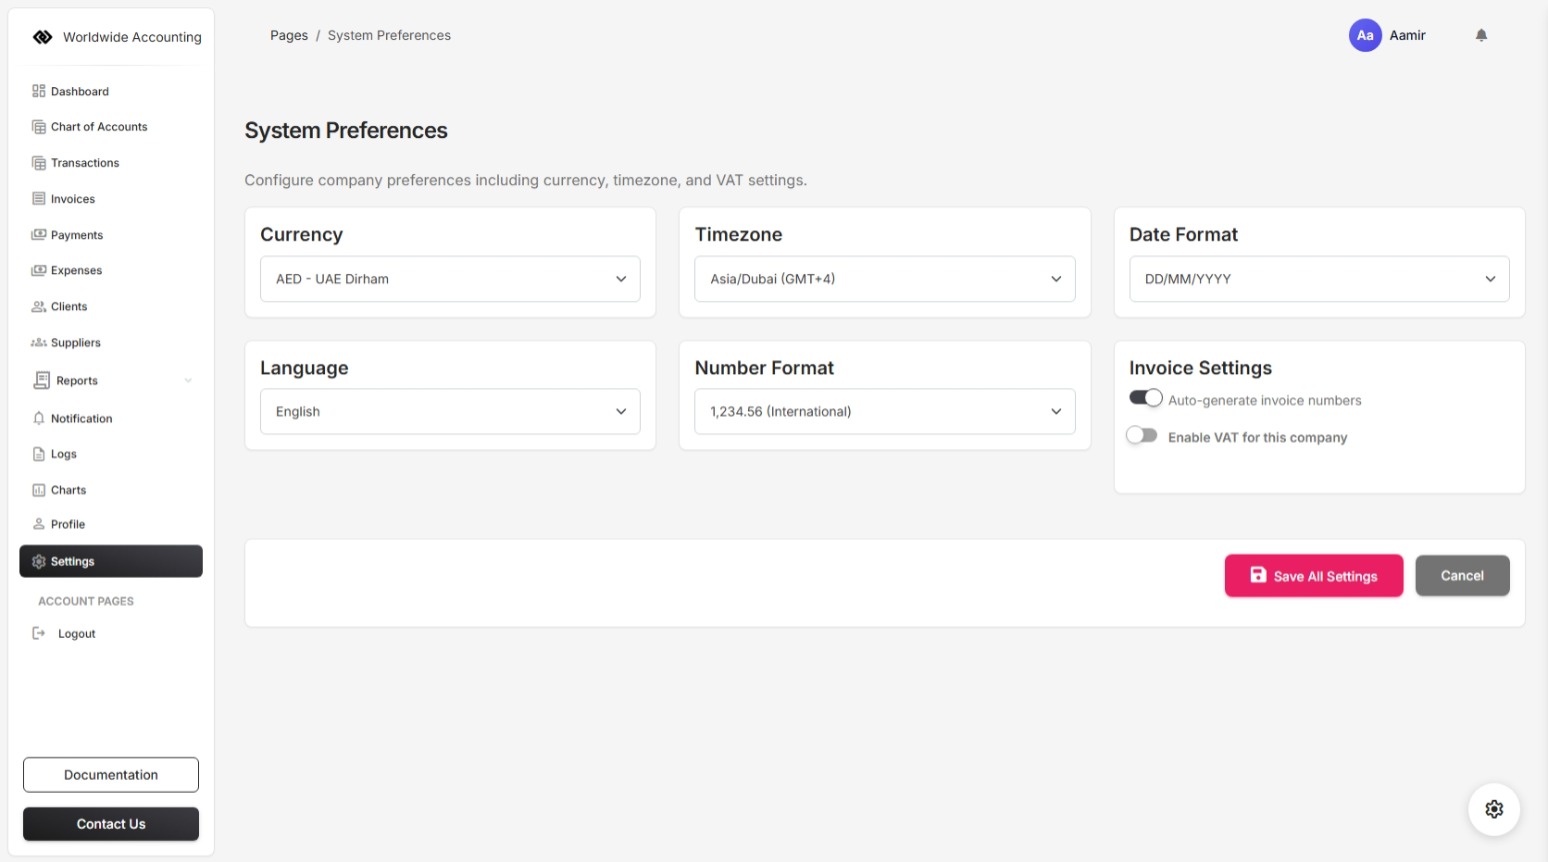
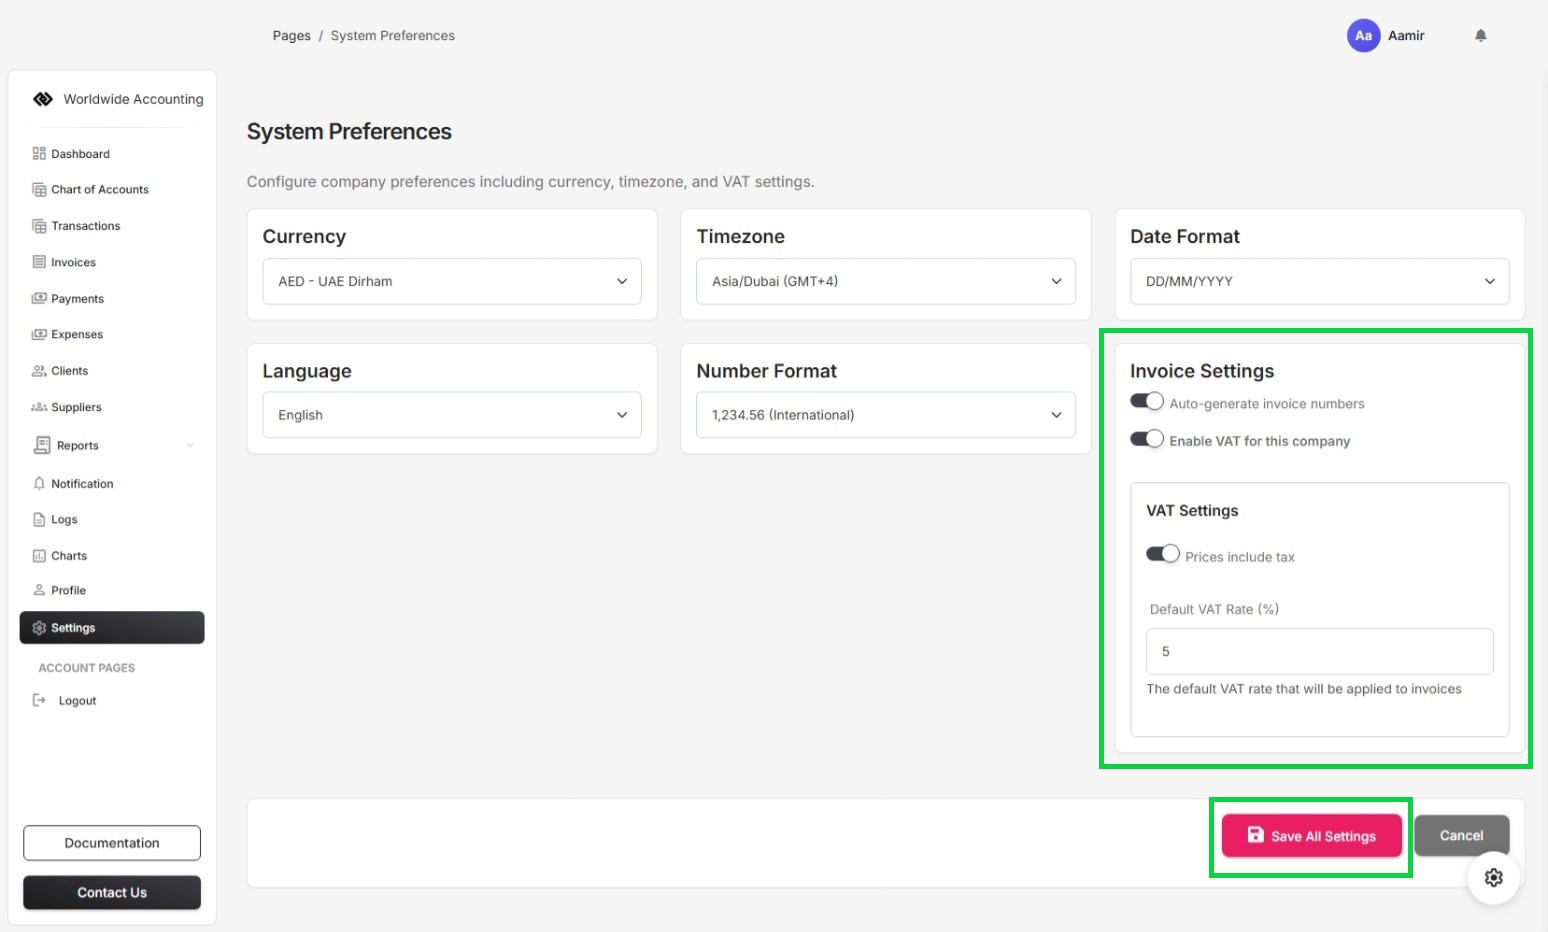
To configure the vat settings for vat registered company, enable the switch "Enable VAT for this company". it will show the VAT details,
1. Prices include tax and
2. Default VAT Rate (%)
if the user vat prices are inclusive, the swtich "Prices include tax" should be enabled, or if the prices are exclusive the switch "Prices include tax" should be disabled.
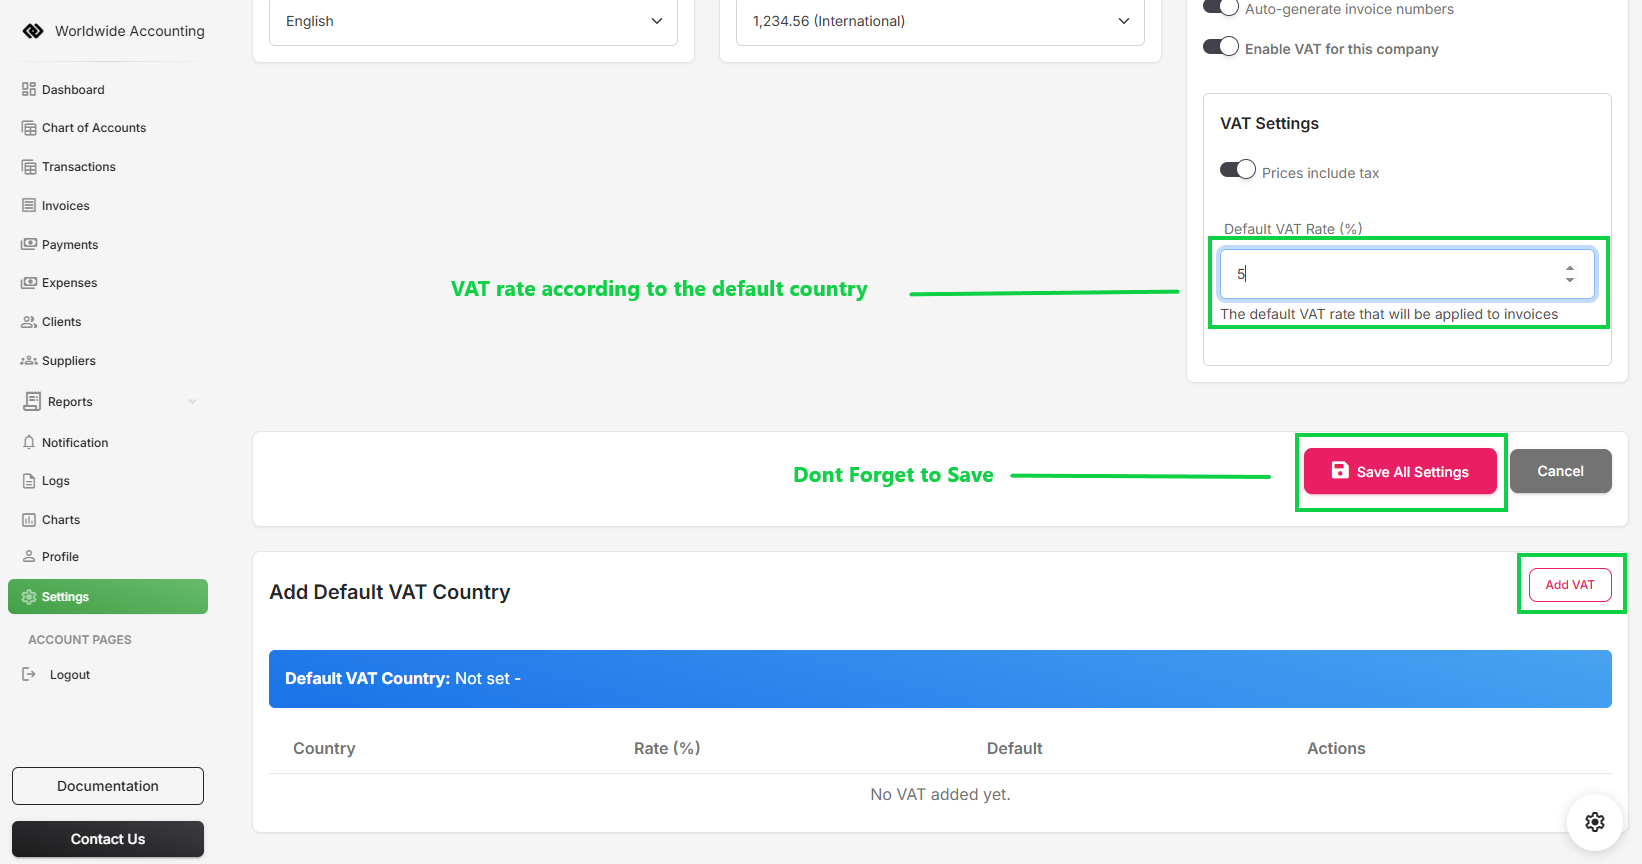
Now user has configured the vat settings for vat registered company, if the company is non vat company, the switch "Enable VAT for this company" should be off.
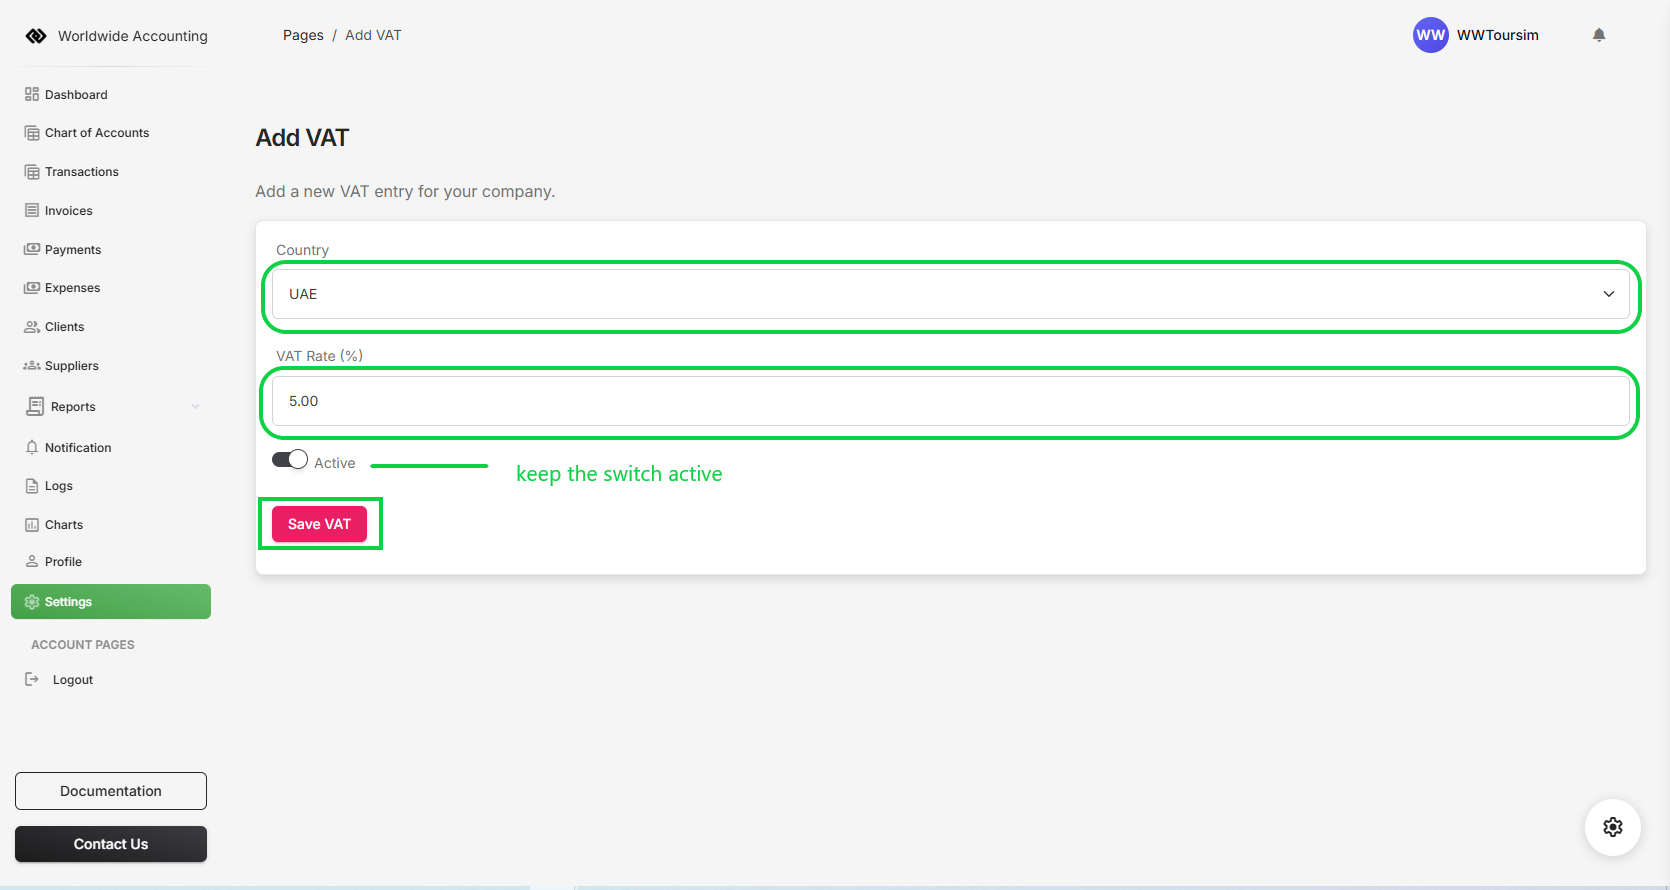
As in previous step when the user click on the switch "Enable VAT for this company". it shows the VAT settings, and below that it will show the section of Default VAT Country, the user should must add the Default VAT country, otherwise the VAT system will not work perfectly, the user can click on the button "Add VAT" and it will show the form to select the Default VAT country and VAT percenatage (%).
Select the country name from dropdown and the VAT will be auto selected, and then click on the save button, Now are you have configured the full settings of the VAT.
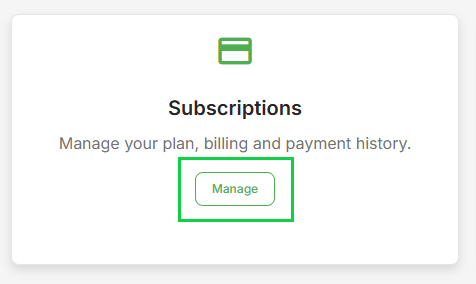
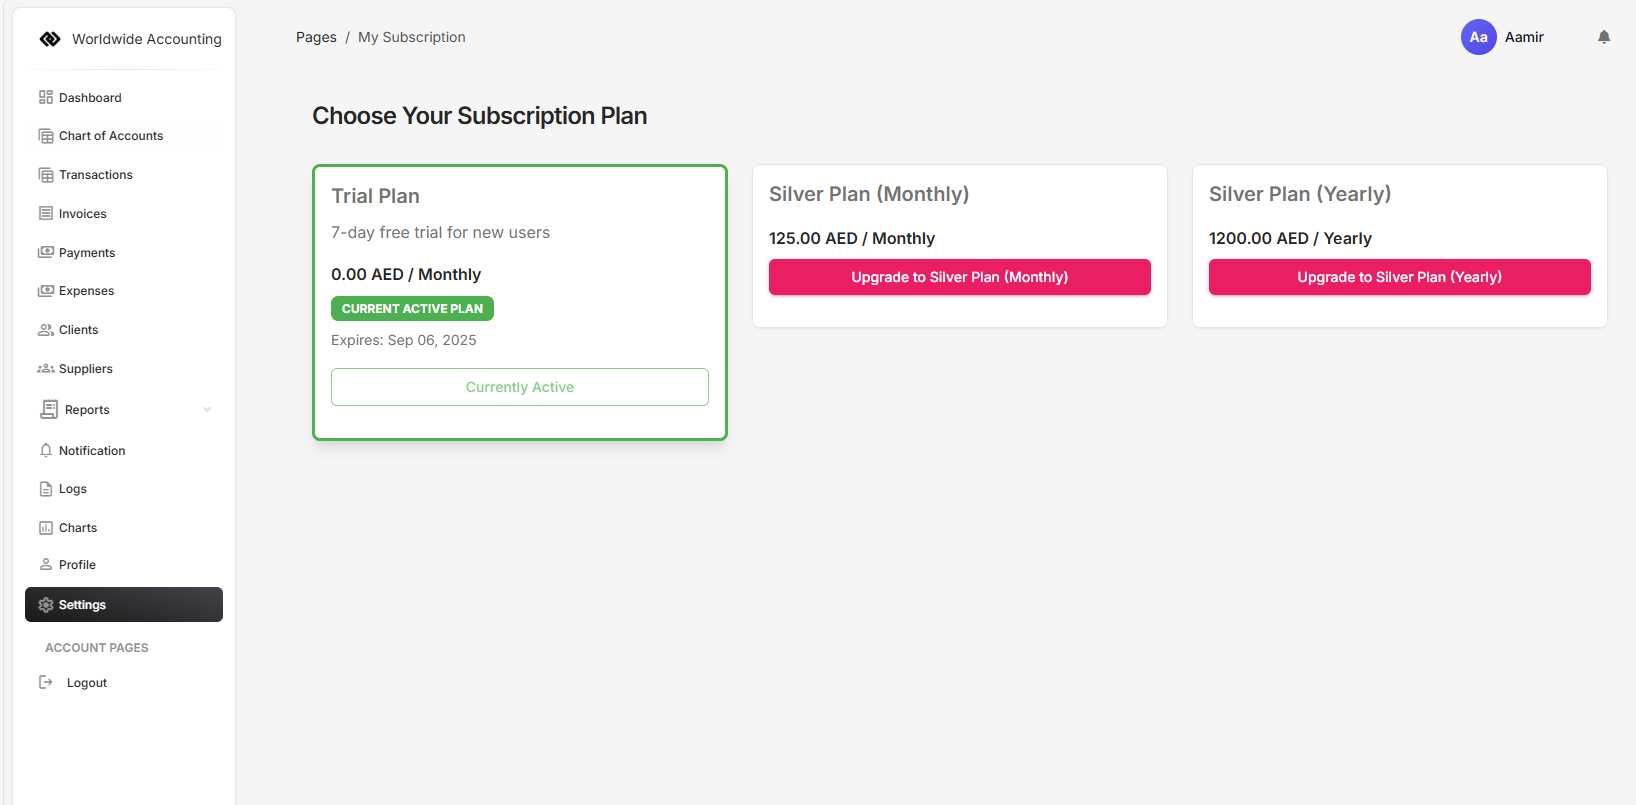
The User can manage the subscriptions by clicking the manage button in subscriptions module, it will open the subscriptions page, where the user can subscribe with monthly or yearly package, by default the user can only use the Trial package which will be only for 7 days. after that the system will be locked, and the user will be unable to use the accounting software, but after subscribing the package the user can avail all the premium modules and reports for monthly and yearly accordingly.
The subscriptions page shows the details, that which subscription has been activated by the user, to subscribe the premium monthly or yearly package, the user can click on the button Update to Silver Plan (Monthly) if he wants to subscribe for montly subscription and can click on the button Update to Silver Plan (Yearly), if he wants to subscribe to the yearly package.
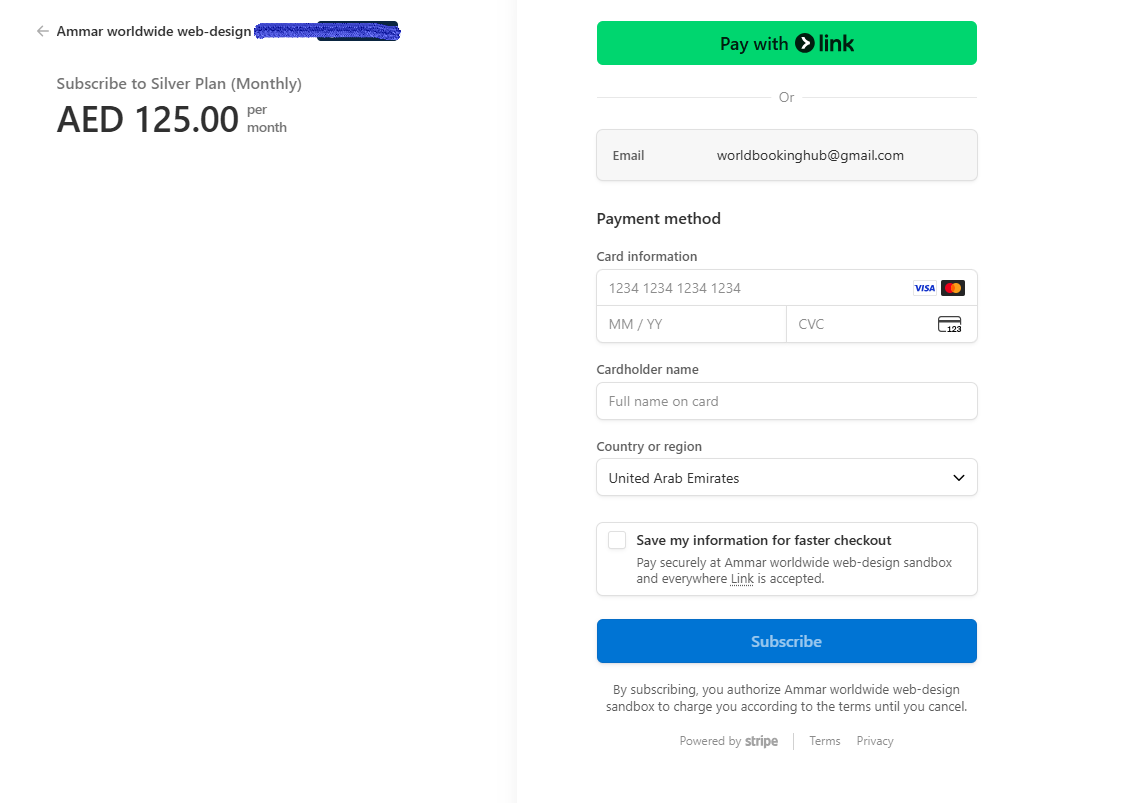
After clicking the button Update to Silver plan (Monthly) or Silver Plan (Yearly) button, it will be redirected to the Stripe Checkout, where the user can fillout the card details and then the package will be activated. it will be redirected to success page, the Subscriptions section can be accessed by the button "Go to Subscriptions section".
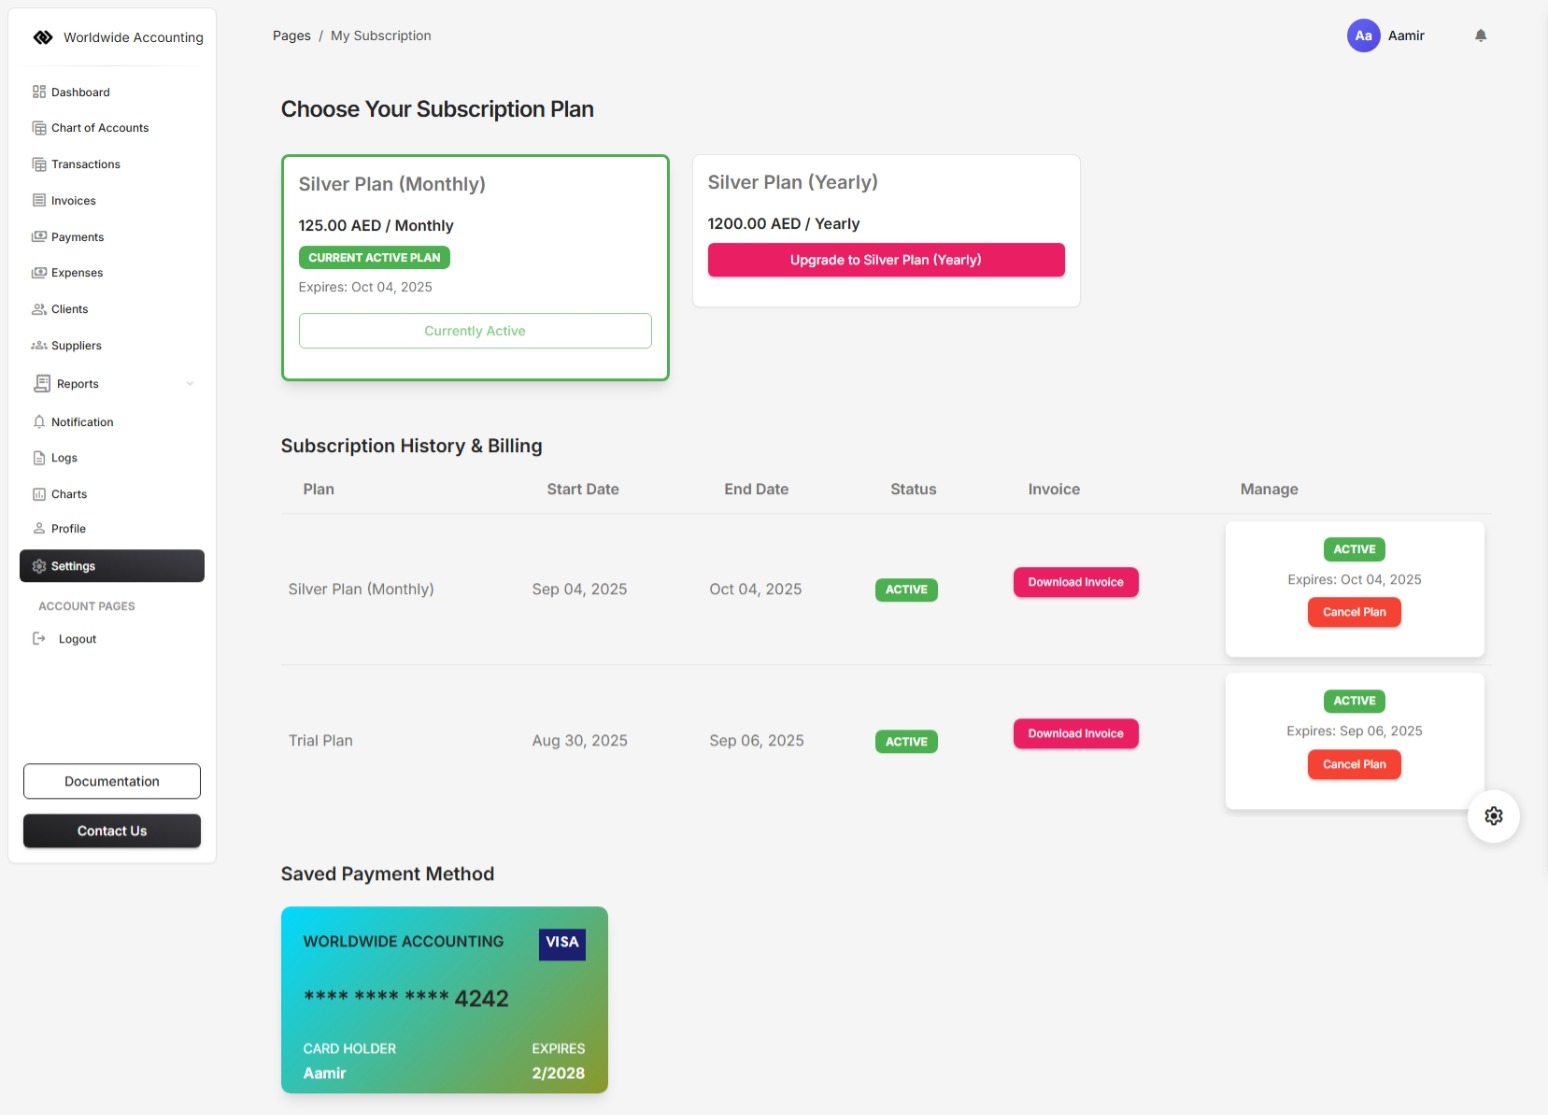
In subscriptions section you can see all the activated and available plans, user can upgrade to higher plan, and can also cancel the subscription at any time, it will scheduled to the end of the subscription date for cancellation.
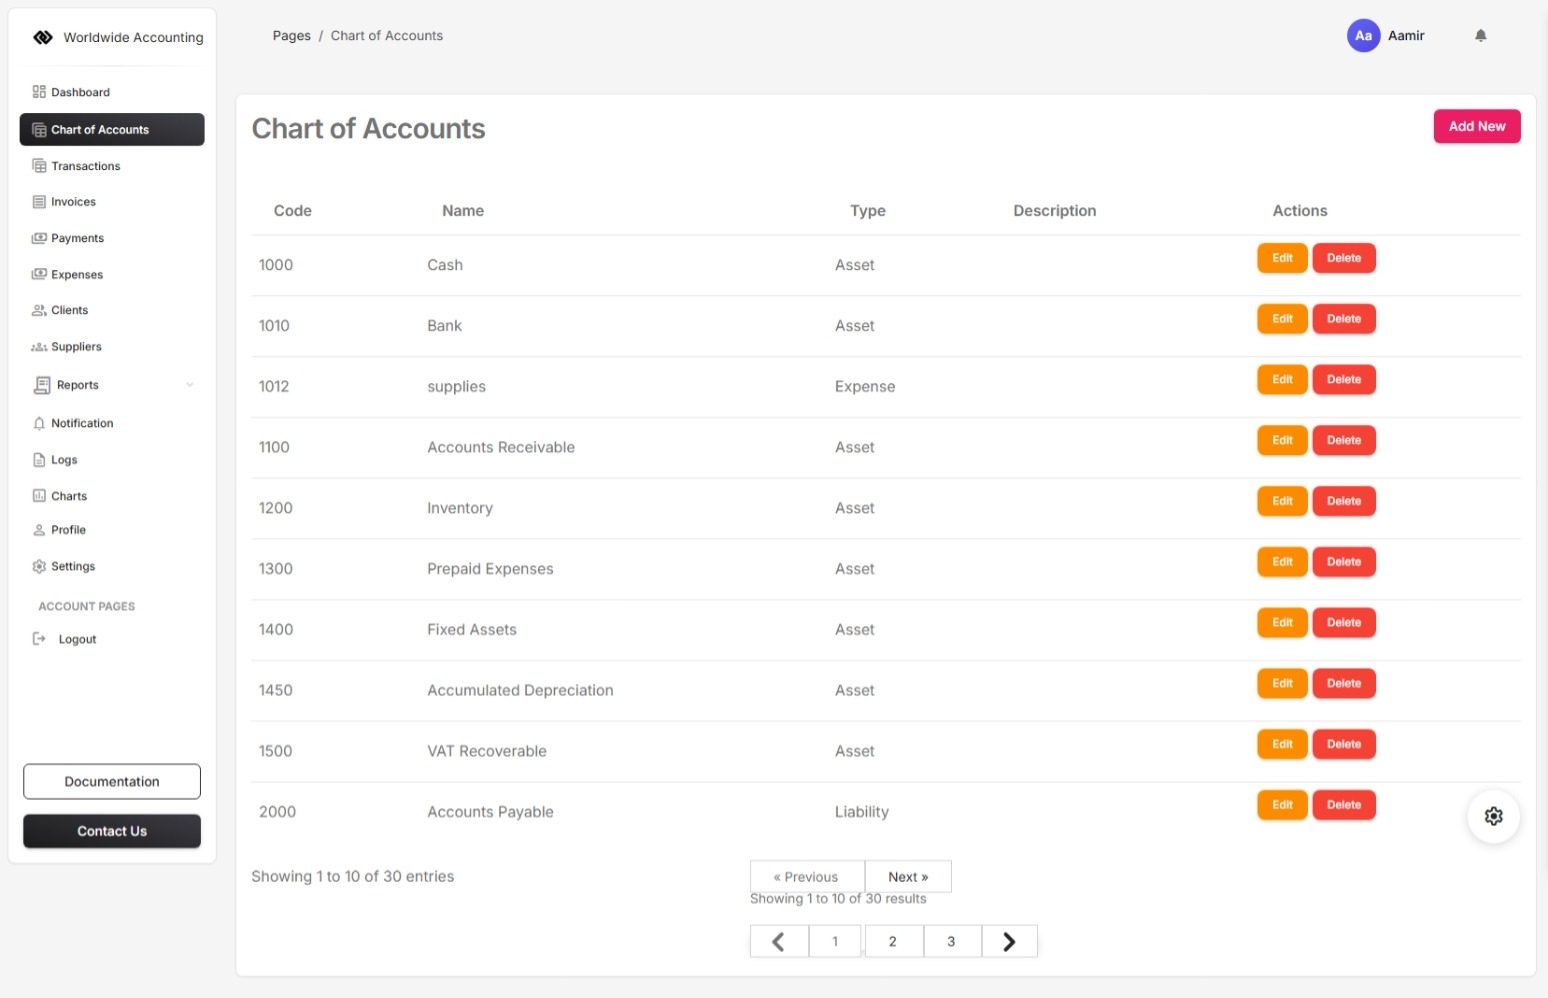
A chart of accounts (COA) is an organized list of all financial accounts used by a company to record transactions in its general ledger, categorized by type such as assets, liabilities, equity, revenue, and expenses. It provides a unique identifier for each account, facilitating consistent data entry and enabling the analysis of a business's financial health.
User can Add & Update the codes and chart of accounts elements. But user should not delete and update the default chart of accounts, he should add his own additional chart of accounts elements. Otherwise the accounting system for that user may not work properly.
Transaction represents any financial activity recorded in the accounting system. It is the fundamental building block of accounting records and ensures that every business activity affecting the company's financial position is tracked accurately.
The Transaction automatically generated when the invoice creates with paid status, and also generates when a payment creates with paid status against the invoice.
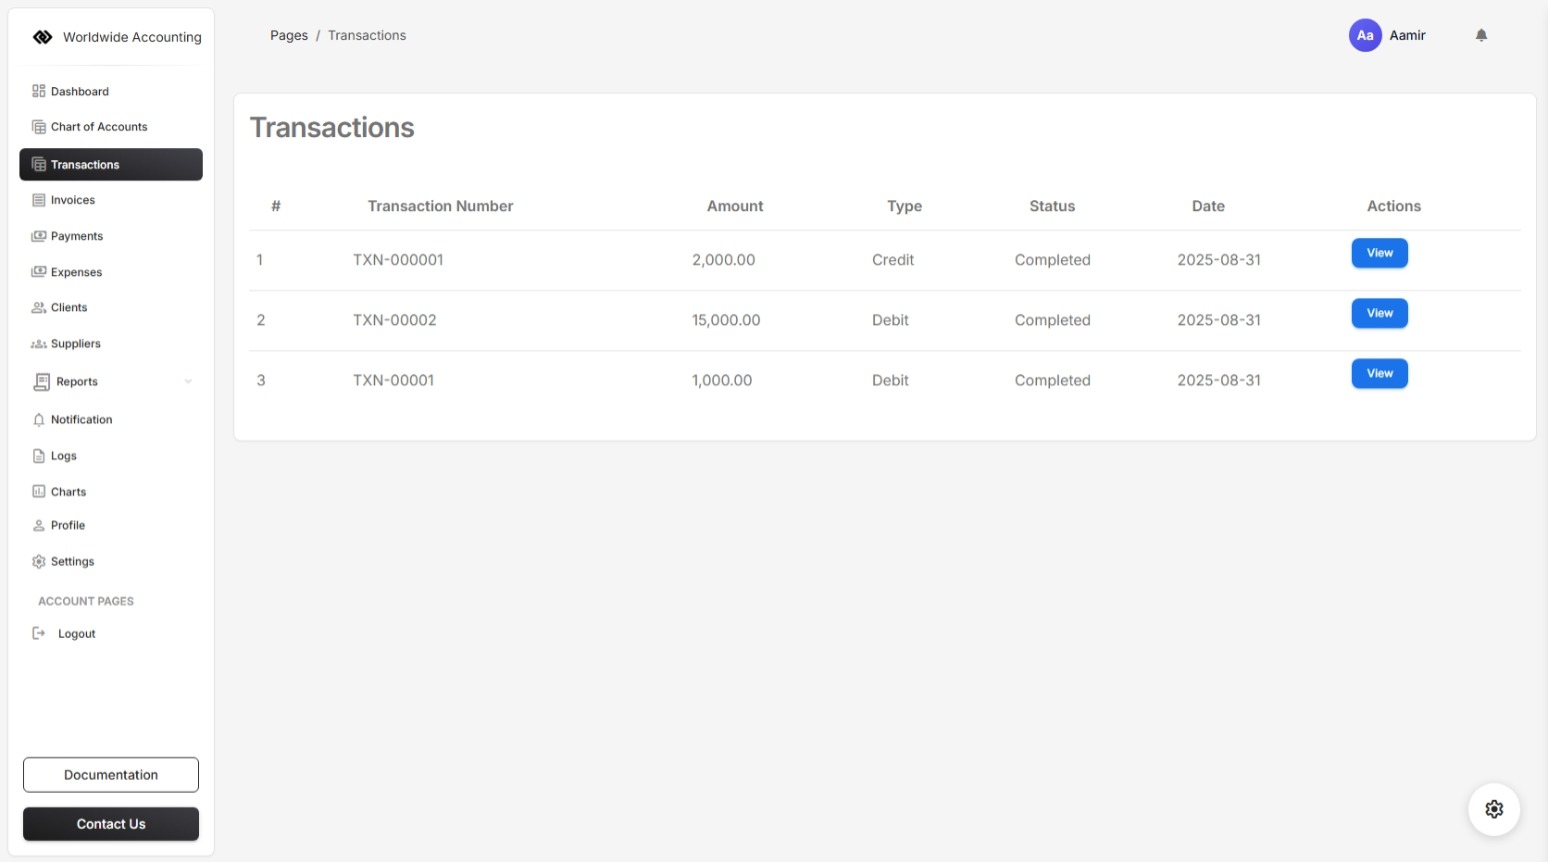
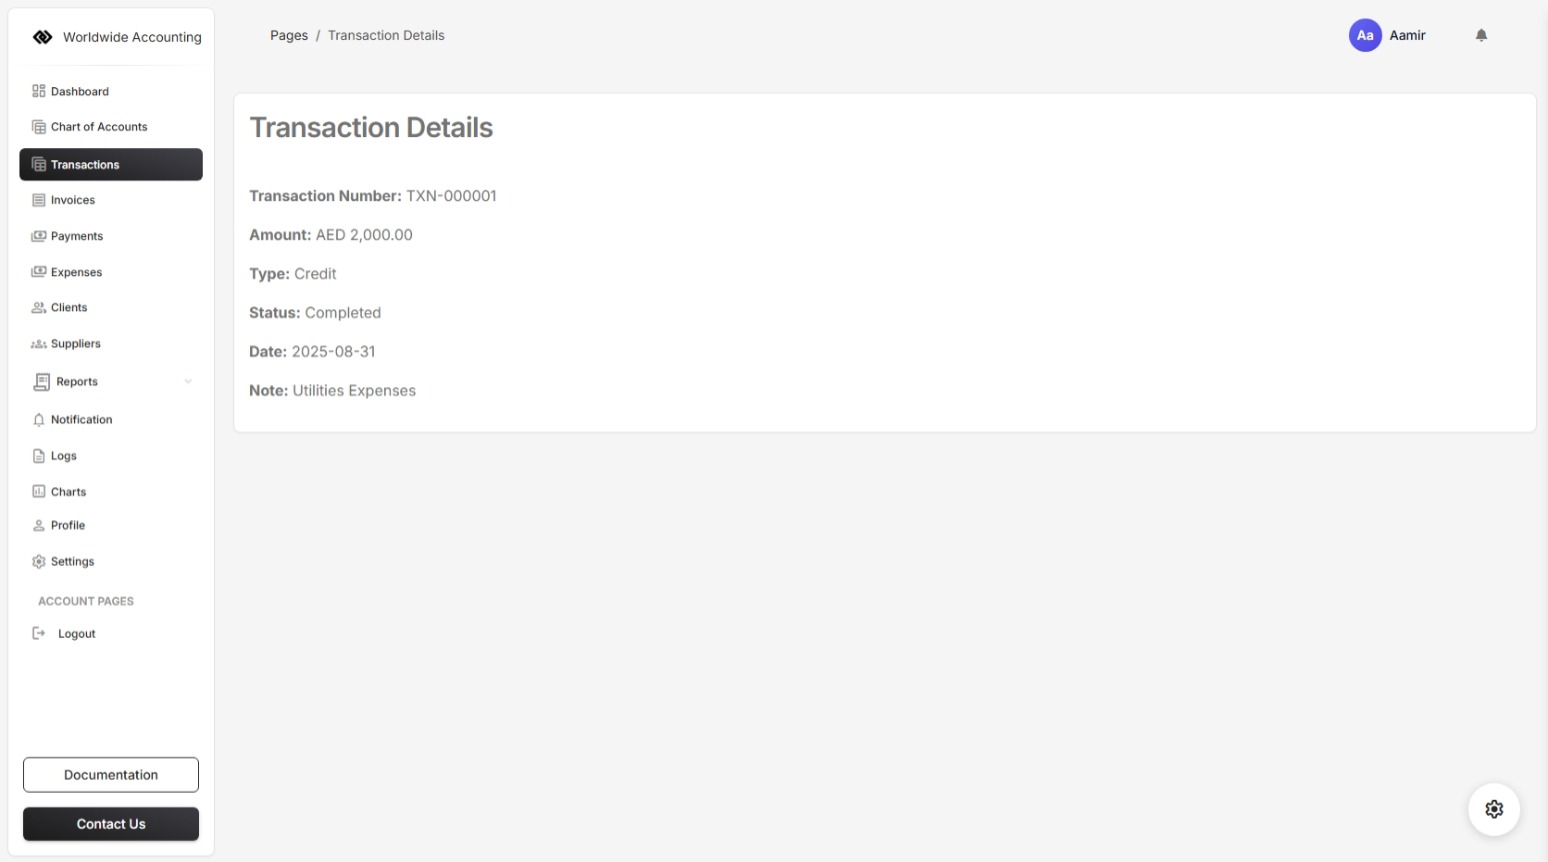
By Clicking the View button User can check each Transaction. The transaction details shows Transaction Number, Amount, Type, Status, Date, and Note.
An Invoice in the software is a document that records the sale of goods or services to a Client. It serves as both a request for payment and a financial record in your company's accounts.
When you create an invoice, the system automatically generates the related accounting entries (e.g., Accounts Receivable and Sales Revenue), ensuring accurate bookkeeping without requiring manual journal entries.
Key Features of Invoices in the Software:
- Client Information – Select or add the Client's details (name, contact, etc.), by default the Client details are not added, so the user should add the Client details in Client Section.
- Invoice Number – Auto-generated for easy tracking and auditing.
- Date & Due Date – Define when the invoice was issued and when payment is expected.
- Line Items – Add products or services, quantity, unit price, tax, and discounts.
- Tax Handling – Supports inclusive and exclusive tax settings depending on your preferences.
- Automatic Accounting Entries – Once saved, the system posts the transaction to the general ledger.
- Status Tracking – Invoices can be Draft, Sent, Paid, Partially Paid, or Overdue.
- Payment Integration – Apply payments directly against invoices to keep accounts receivable updated.
- PDF Download & Email – Generate a professional invoice PDF and send it to the Client.
Example Workflow:
- Go to Invoices from the menu.
- Click Create New Invoice.
- Fill in Client details, items/services, taxes, and terms.
- Save and send the invoice to the Client.
- When payment is received, record it in the system — the software will automatically update the Client’s balance and accounts.
Tip: Invoices form the basis of your revenue tracking. Always ensure they are created for every sale, so your accounts stay accurate and up to date.
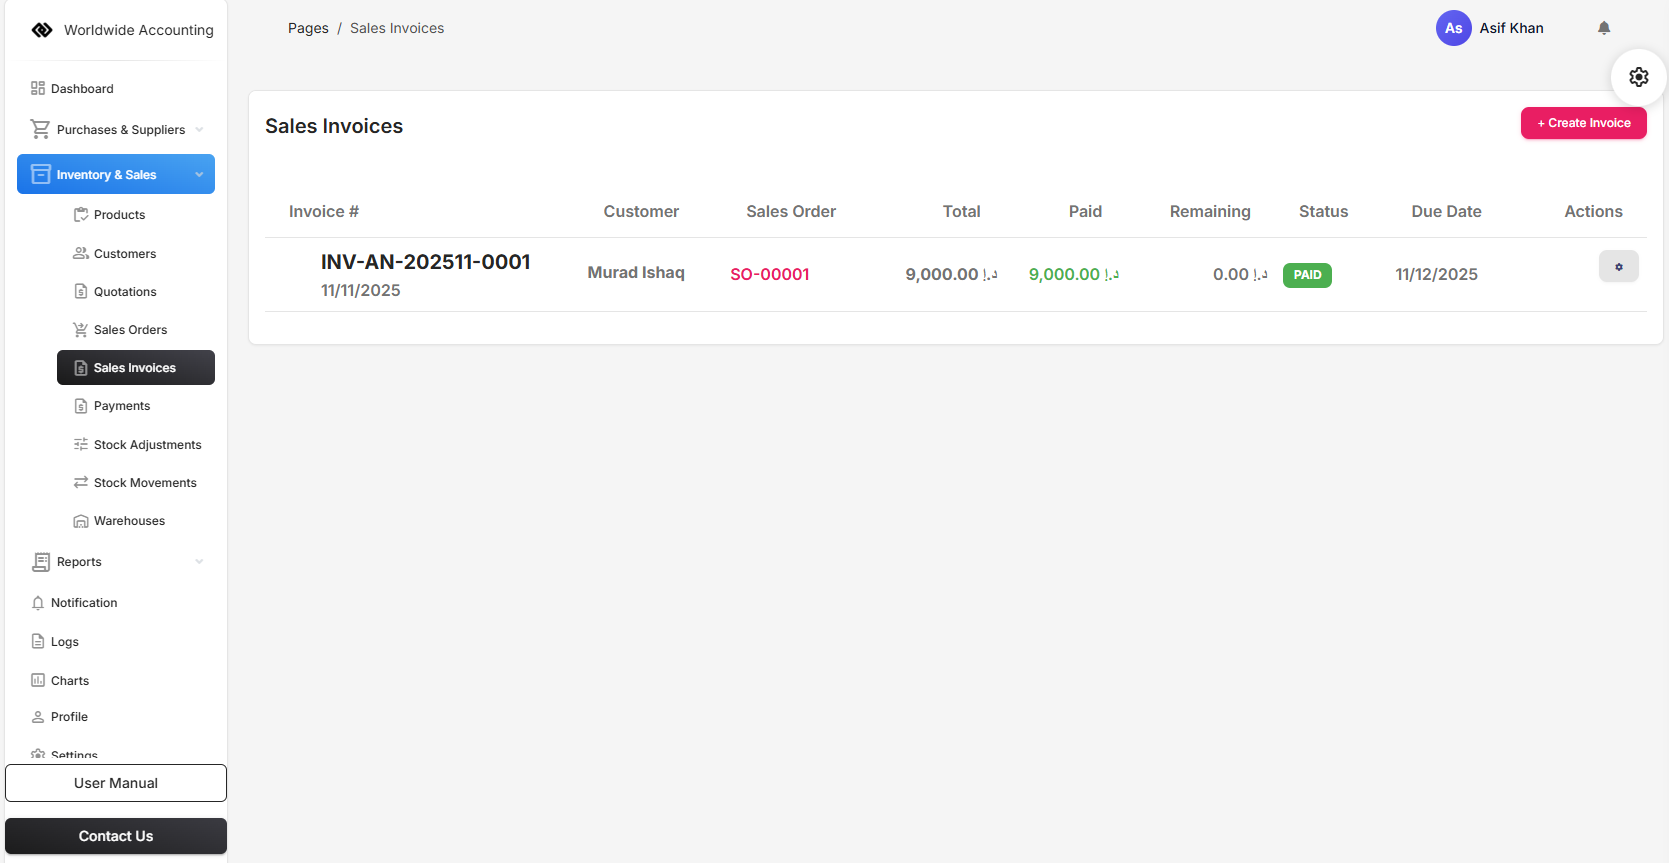
By clicking the actions button it will popup a small card that will contain Delte, View Invoice, Download PDF, and Export Excel actions.
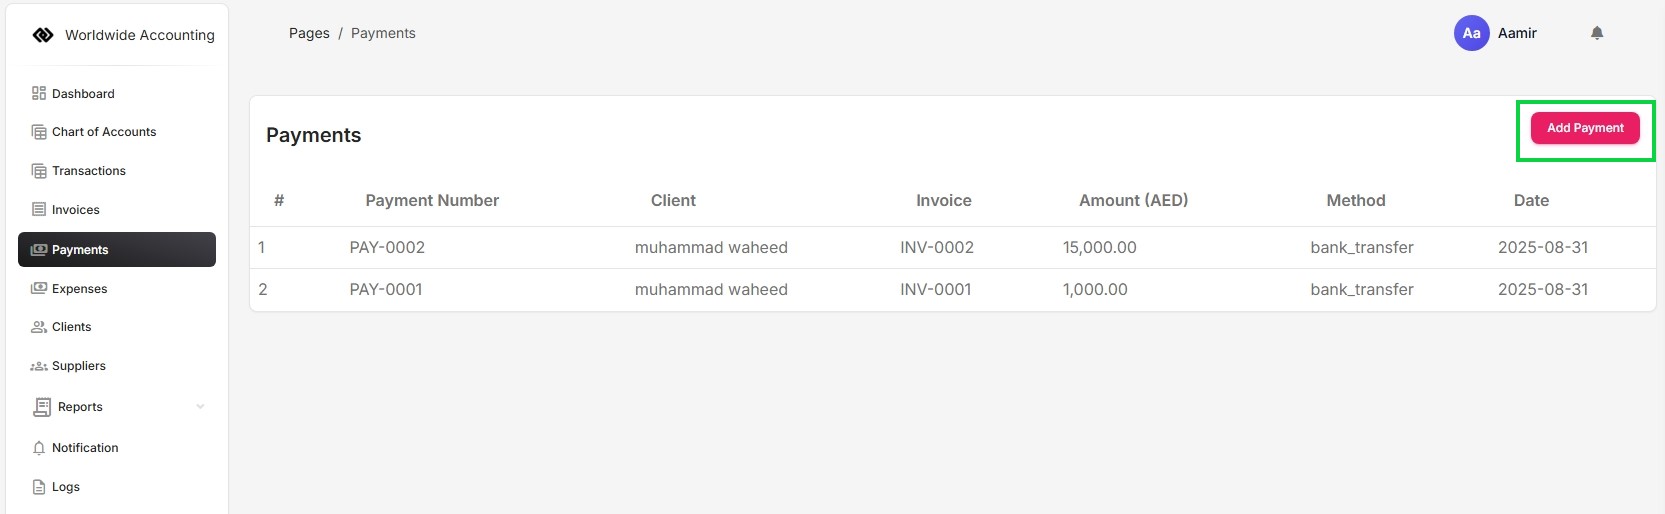
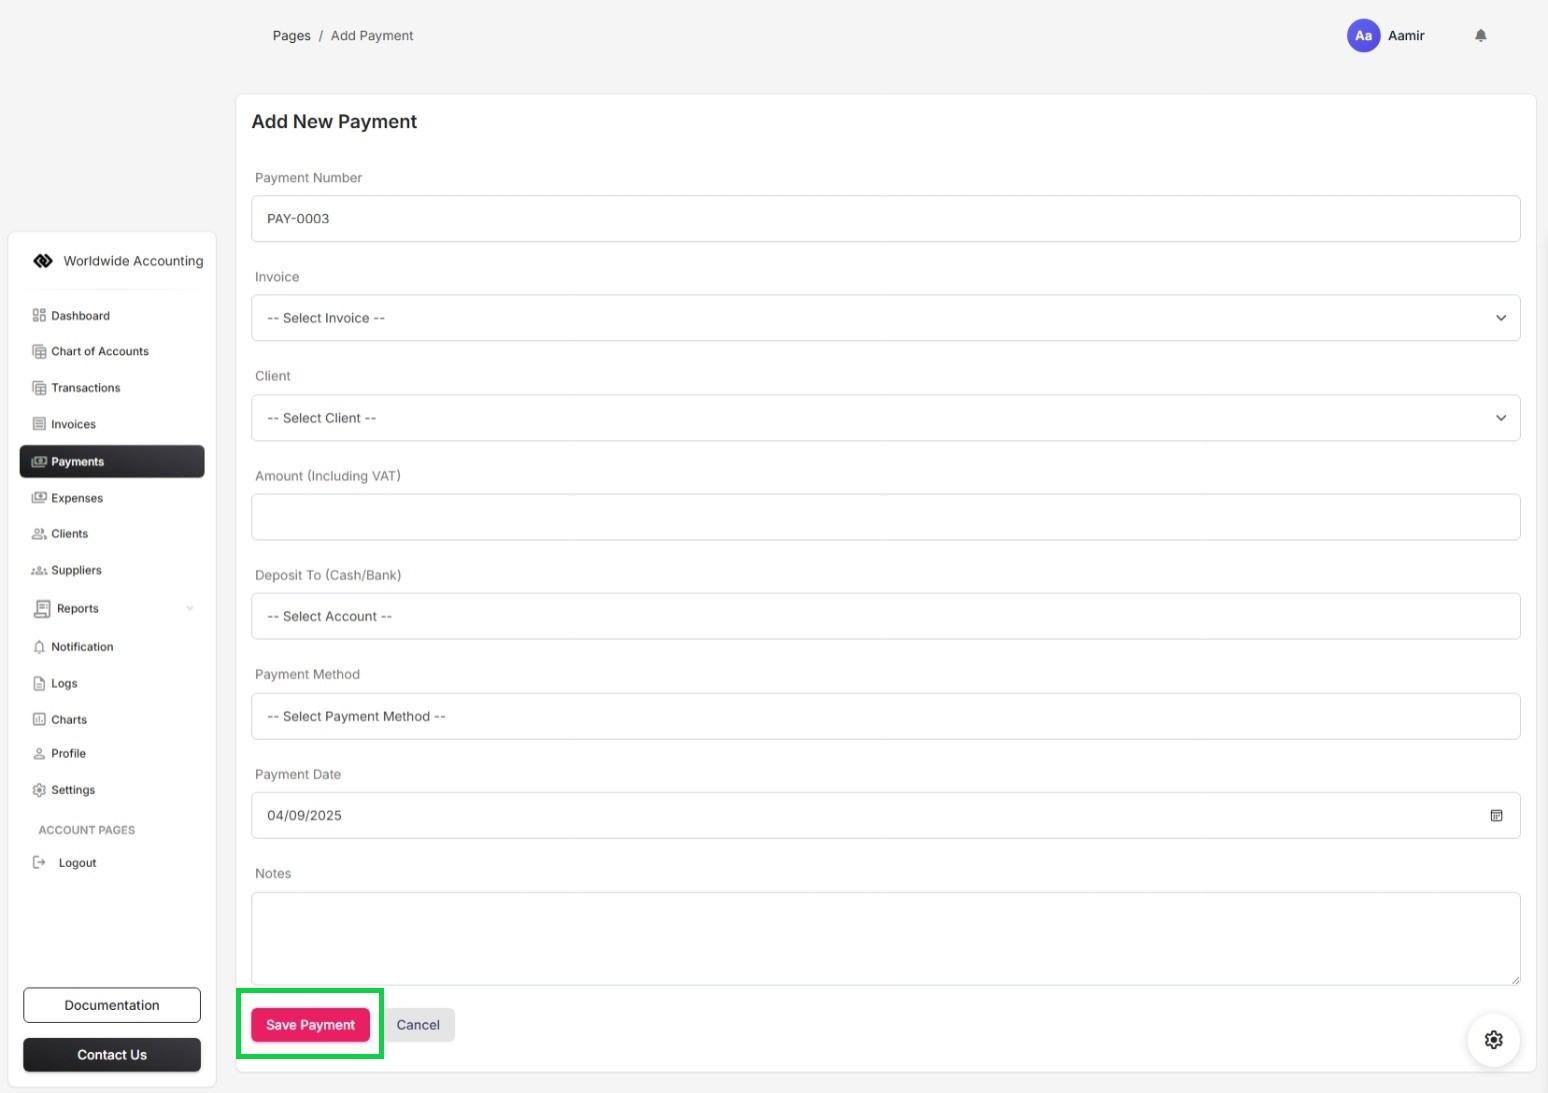
In the payment form we can add the payment against the invoice that is Unpaid or Overdue. by selecting the invoice it will auto select the invoice amount and invoice number, the user will select the Deposit To (Cash/Bank) and Payment Method accounts from the dropdowns, user will select the Payment Date, after filling all the inputs, the user can click the button "Save Payment".
It will create the payment record and on the base of this record, the reports will be generated accordingly. That can be checked by the left side Dashboard Menu link Reports.
An expense is the cost incurred by a business or individual in the process of generating revenue or maintaining operations. It represents the outflow of money, reduction of assets, or creation of liabilities resulting from activities such as purchasing goods, acquiring services, paying salaries, utilities, rent, or other operational costs. In accounting, expenses are recorded on the income statement and directly reduce net income. They are typically classified into categories such as operating expenses, administrative expenses, financial expenses, and non-operating expenses.
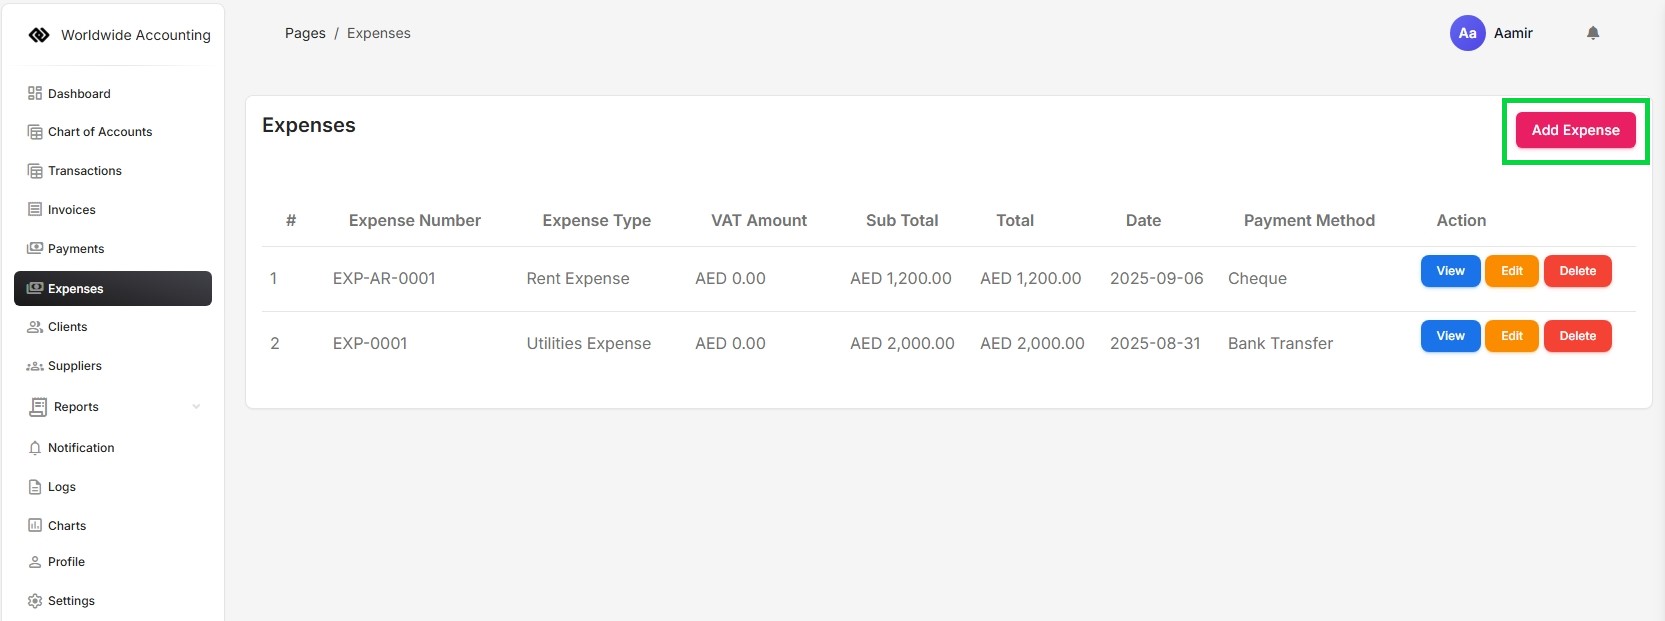
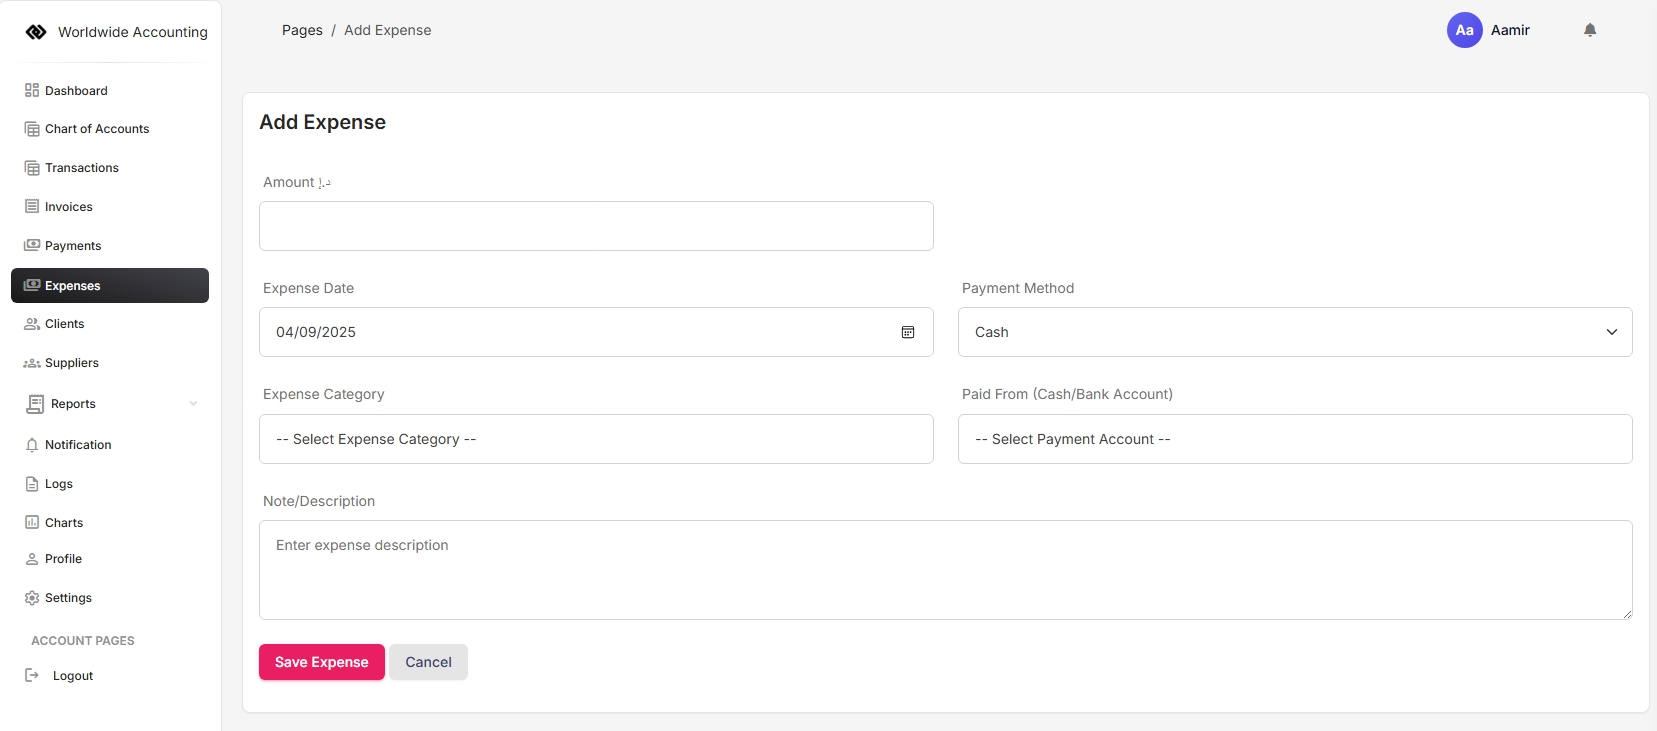
The Expense Create/Add form contains the following fields, Amount Expense Date, Payment Method, Expense Category, Paid From (Cash/Bank Account), and Note/Description, after filling the fields the user can save the form by clicking "Save Expense" button. The Record will be showing from the left side Dashboard Menu link Expenses.
The Customers module is your central hub for managing all customer relationships and interactions. It provides comprehensive customer profiles, contact management, and interaction tracking to help you build stronger business relationships and provide better customer service.
Each customer record contains complete information including contact details, billing addresses, payment terms, credit limits, and transaction history. This centralized customer database ensures all team members have access to up-to-date customer information.
Key Features:
- Complete customer profile management with contact information
- Track customer transaction history and payment patterns
- Manage billing and shipping addresses
- Set credit limits and payment terms
- Track customer communications and interactions
- Generate customer-specific reports and analytics
- Quick access to customer invoices, quotations, and payments
Customer Information Includes:
- Basic Details: Name, email, phone, company information
- Address Information: Billing and shipping addresses
- Financial Details: Payment terms, credit limits, tax information
- Transaction History: All invoices, payments, and quotations
- Communication Log: Record of all customer interactions
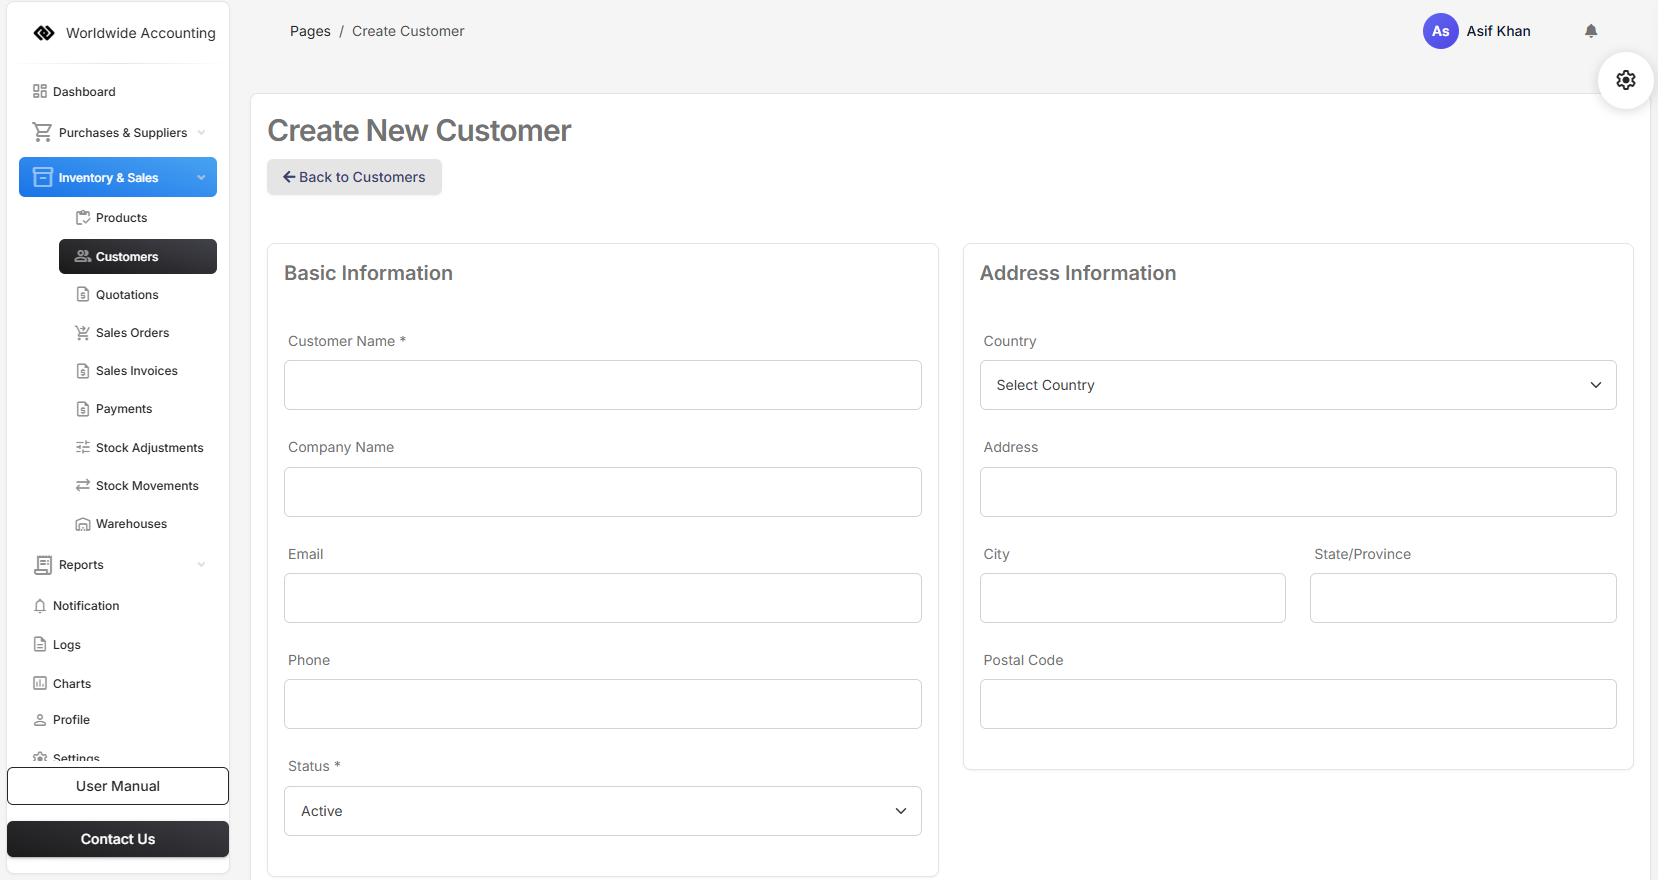
To add a new customer, navigate to Customers from the main menu and click "Add Customer". Fill in the customer details including contact information, addresses, and any specific terms or notes. Once saved, you can quickly create invoices, quotations, and track all interactions with that customer.
The customer dashboard provides a quick overview of each customer's activity, including recent transactions, outstanding balances, and communication history. This helps you provide personalized service and maintain strong customer relationships.

Adding new customers is a straightforward process that ensures you capture all essential information needed for effective customer relationship management and accurate invoicing.
Steps to Add a New Customer:
- Go to Customers from the main navigation menu
- Click the "Add Customer" button
- Fill in the customer information form:
- Basic Information: Customer name, email, phone number
- Company Details: Company name, website, industry
- Billing Address: Complete address for invoicing
- Shipping Address: Delivery address (if different from billing)
- Financial Settings: Payment terms, credit limit, tax information
- Additional Notes: Any special instructions or preferences
- Click "Save Customer" to add to your database
Once a customer is added, you can immediately create invoices, quotations, and sales orders for them. The system will automatically populate customer details in all related documents, saving time and reducing errors.
Pro Tip: Complete as much information as possible when adding new customers. Detailed customer profiles help with personalized communication, accurate invoicing, and better customer service.
Effective customer management involves maintaining accurate and up-to-date customer information. The Customers module provides comprehensive tools to manage and update customer details as needed.
Customer Management Features:
- Quick Search: Find customers instantly using search functionality
- Bulk Actions: Perform actions on multiple customers at once
- Status Tracking: Track customer activity and engagement levels
- Import/Export: Import customer lists or export customer data
- Communication Log: Record all customer interactions and notes
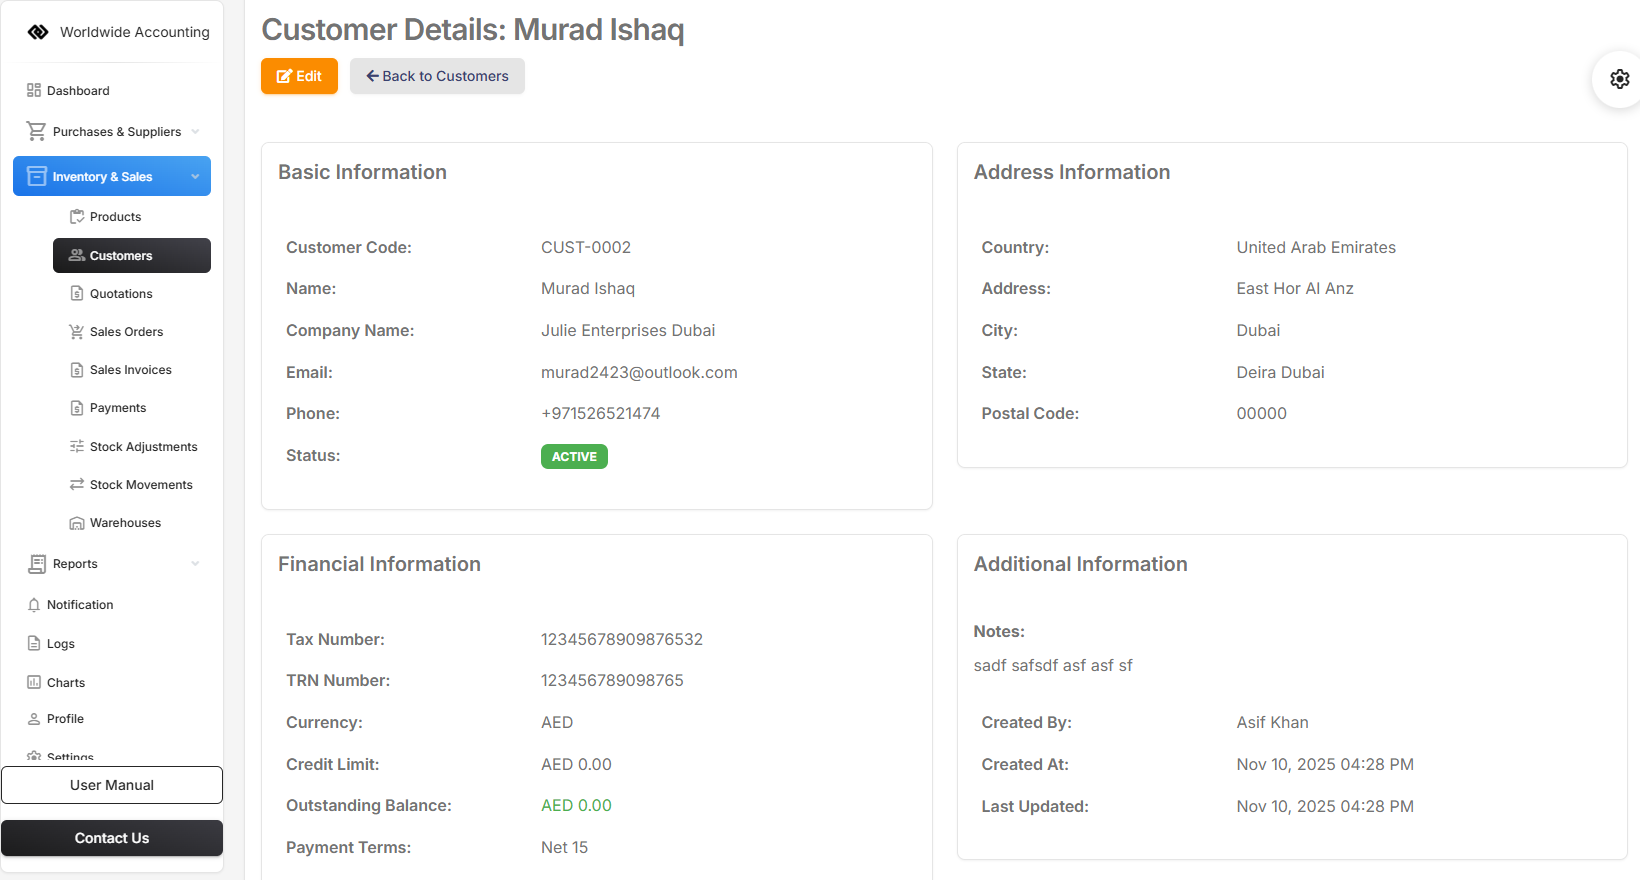
Viewing Customer Details:
Click on any customer from the customers list to view their complete profile. The customer detail page shows:
- Contact information and addresses
- Transaction history with links to invoices and payments
- Outstanding balances and payment status
- Communication history and notes
- Related documents and files
Editing Customer Information:
To update customer information, click the Edit button on the customer detail page. You can modify any information including contact details, addresses, payment terms, or add new notes. All changes are tracked in the system audit log.
Important: Regular updates to customer information ensure accurate invoicing, timely communications, and effective customer relationship management.
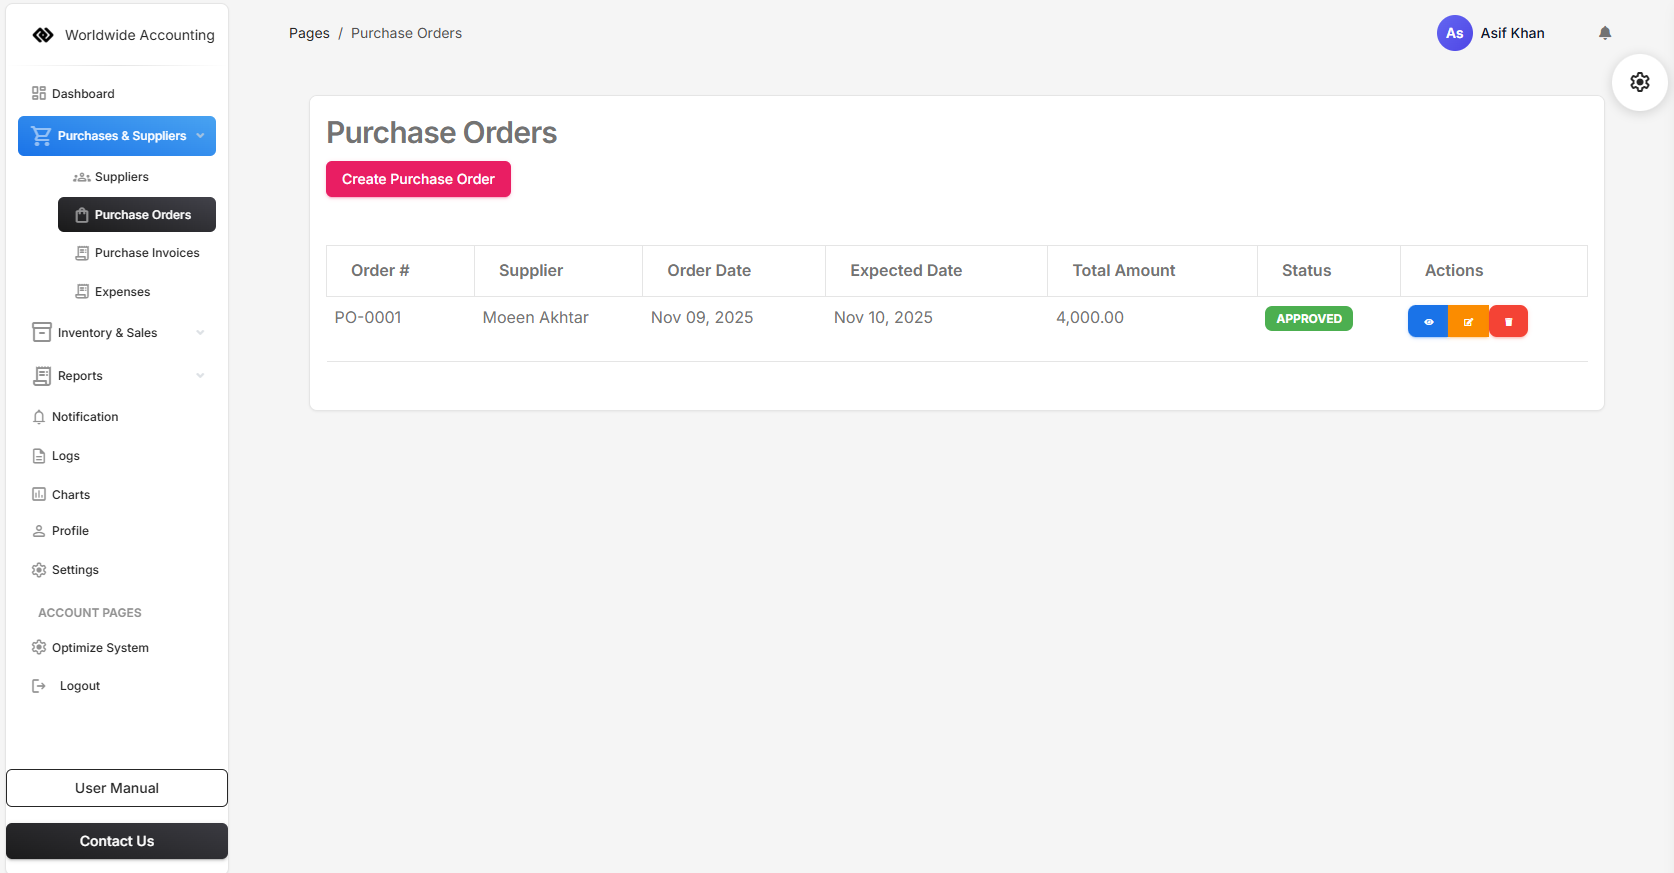
Purchase Orders (POs) are formal documents sent to suppliers to request goods or services. They specify quantities, prices, and delivery terms, serving as a legal agreement between your company and the supplier.
When you create a purchase order, it helps track expected inventory receipts and manage supplier relationships. POs can be converted to purchase invoices when goods are received, streamlining the procurement process.
Key Features:
- Create purchase orders with multiple line items
- Set expected delivery dates
- Track order status (Draft, Sent, Received, Cancelled)
- Convert to purchase invoices automatically
- Maintain purchase history with suppliers
To create a purchase order, navigate to Purchase Orders from the main menu and click "Create Purchase Order". Select your supplier, add products with quantities and prices, set delivery dates, and save the order.
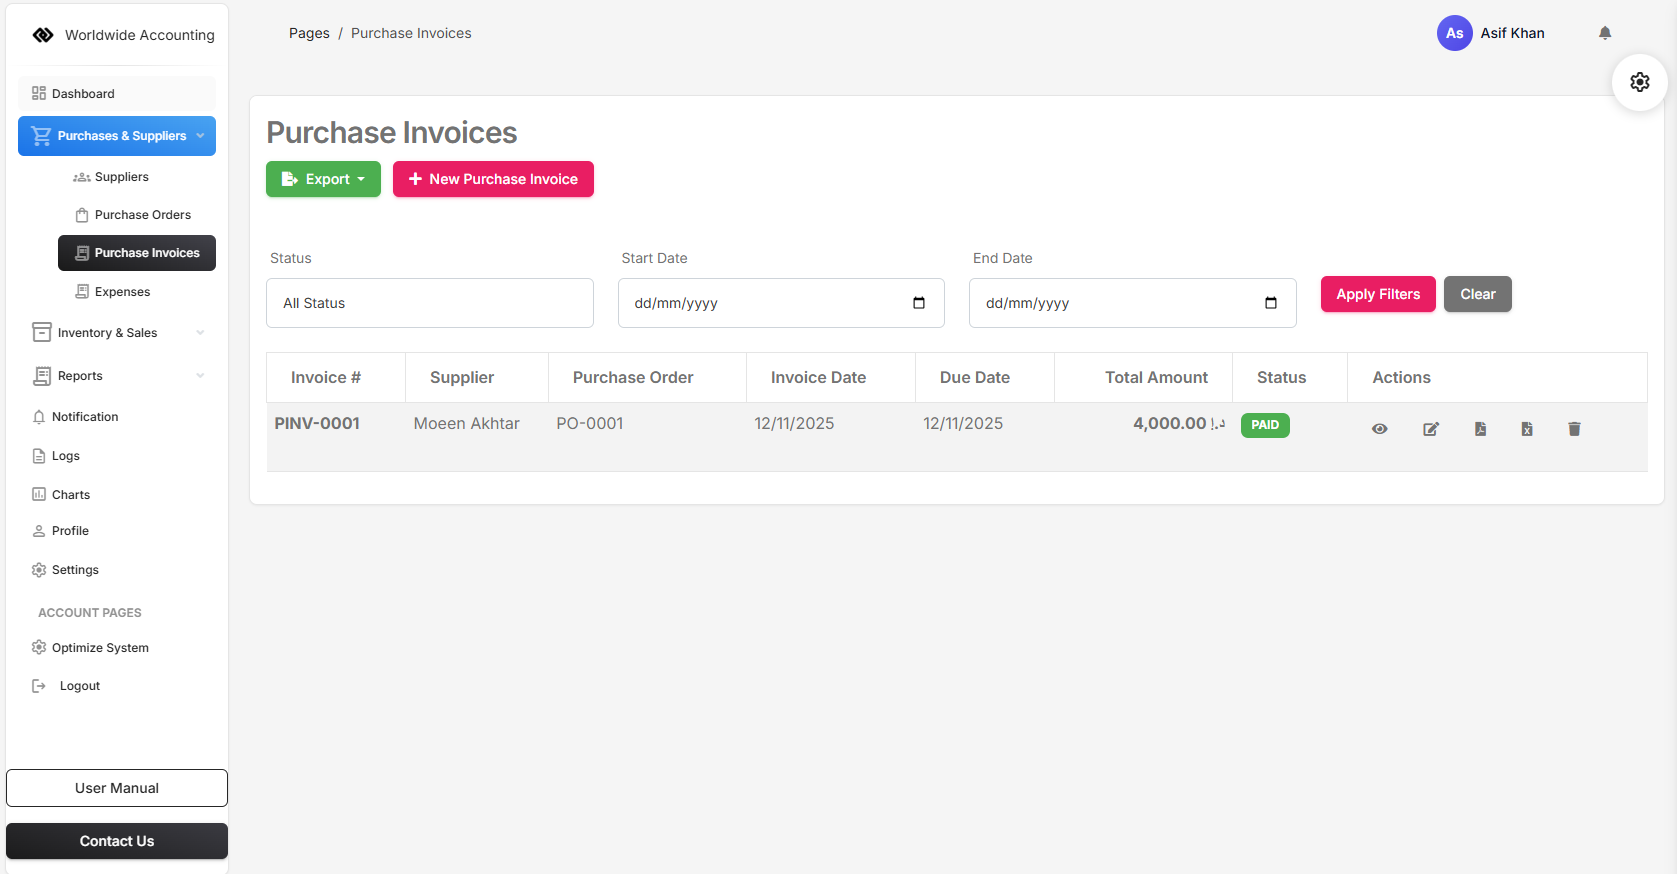
Purchase Invoices are documents received from suppliers for goods or services purchased. They represent accounts payable and need to be recorded for accurate financial tracking.
Purchase invoices can be created manually or automatically generated from purchase orders when goods are received. They track payment status and due dates, helping manage cash flow and supplier payments.
Key Features:
- Record supplier invoices with line items
- Link to purchase orders for automatic population
- Track payment status (Unpaid, Partial, Paid, Overdue)
- Set payment due dates and terms
- Manage accounts payable efficiently
To create a purchase invoice, go to Purchase Invoices and click "New Purchase Invoice". You can select a related purchase order or create manually by selecting the supplier and adding invoice details.
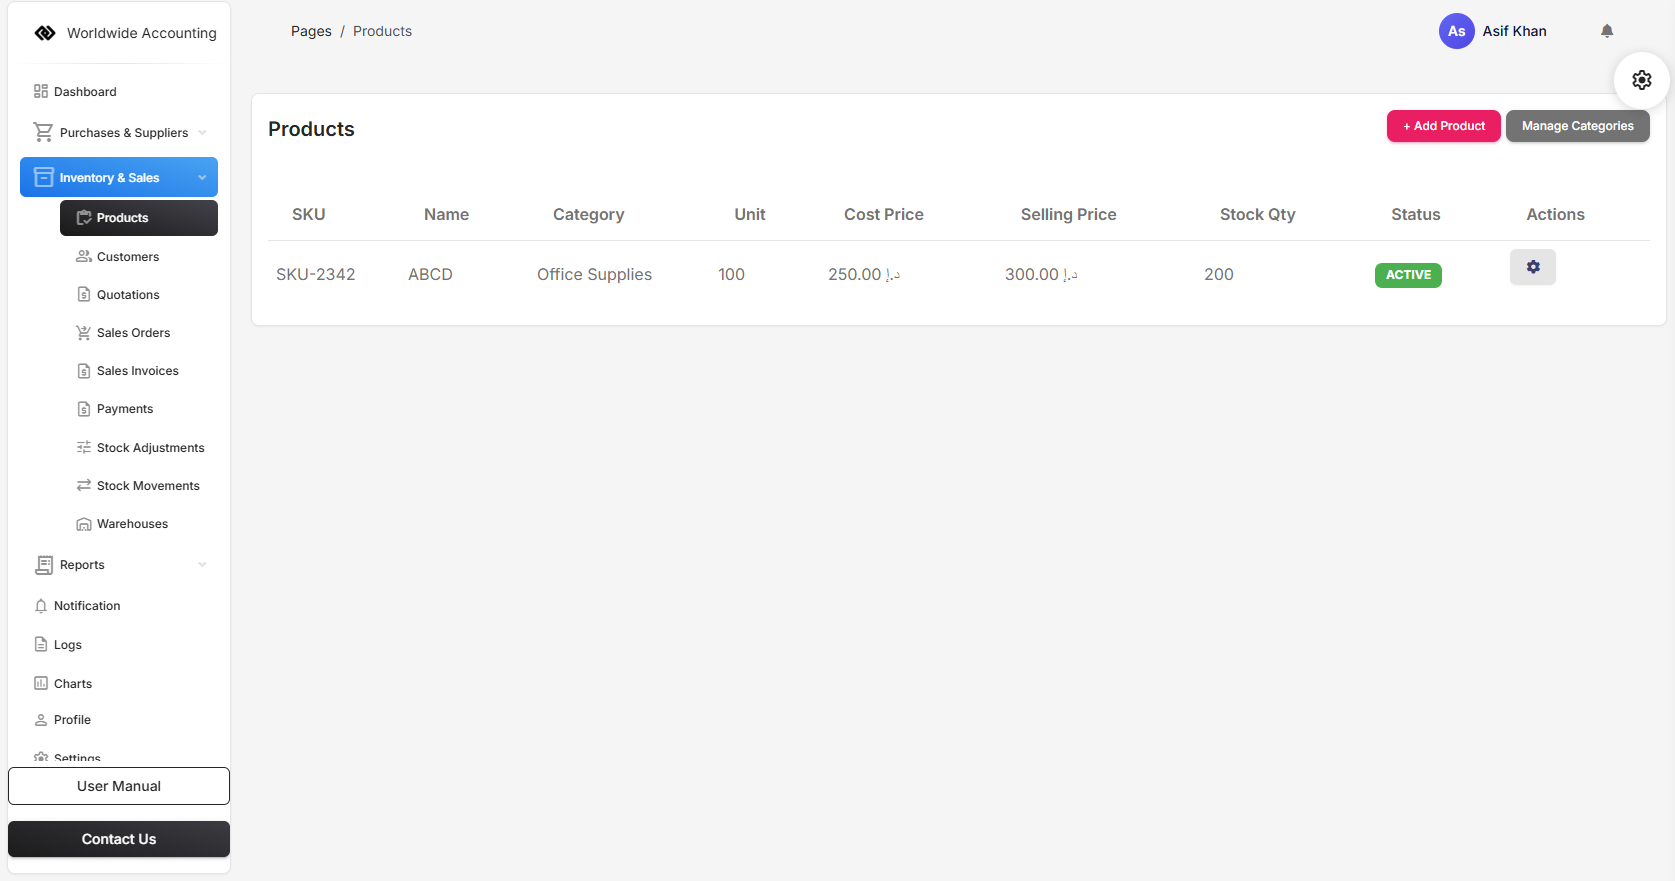
The Products module manages your complete product catalog, including inventory tracking, pricing, and categorization. It serves as the central repository for all items you buy, sell, or manufacture.
Each product record contains essential information like SKU, description, cost price, selling price, stock levels, and reorder points. Products can be organized into categories for easy management.
Key Features:
- Complete product information management
- Track stock levels across multiple warehouses
- Set reorder points and manage inventory alerts
- Manage product categories and suppliers
- Track product sales and purchase history
To add a new product, navigate to Products and click "Add Product". Fill in the product details including name, SKU, prices, initial stock, and category. You can also upload product images for better identification.
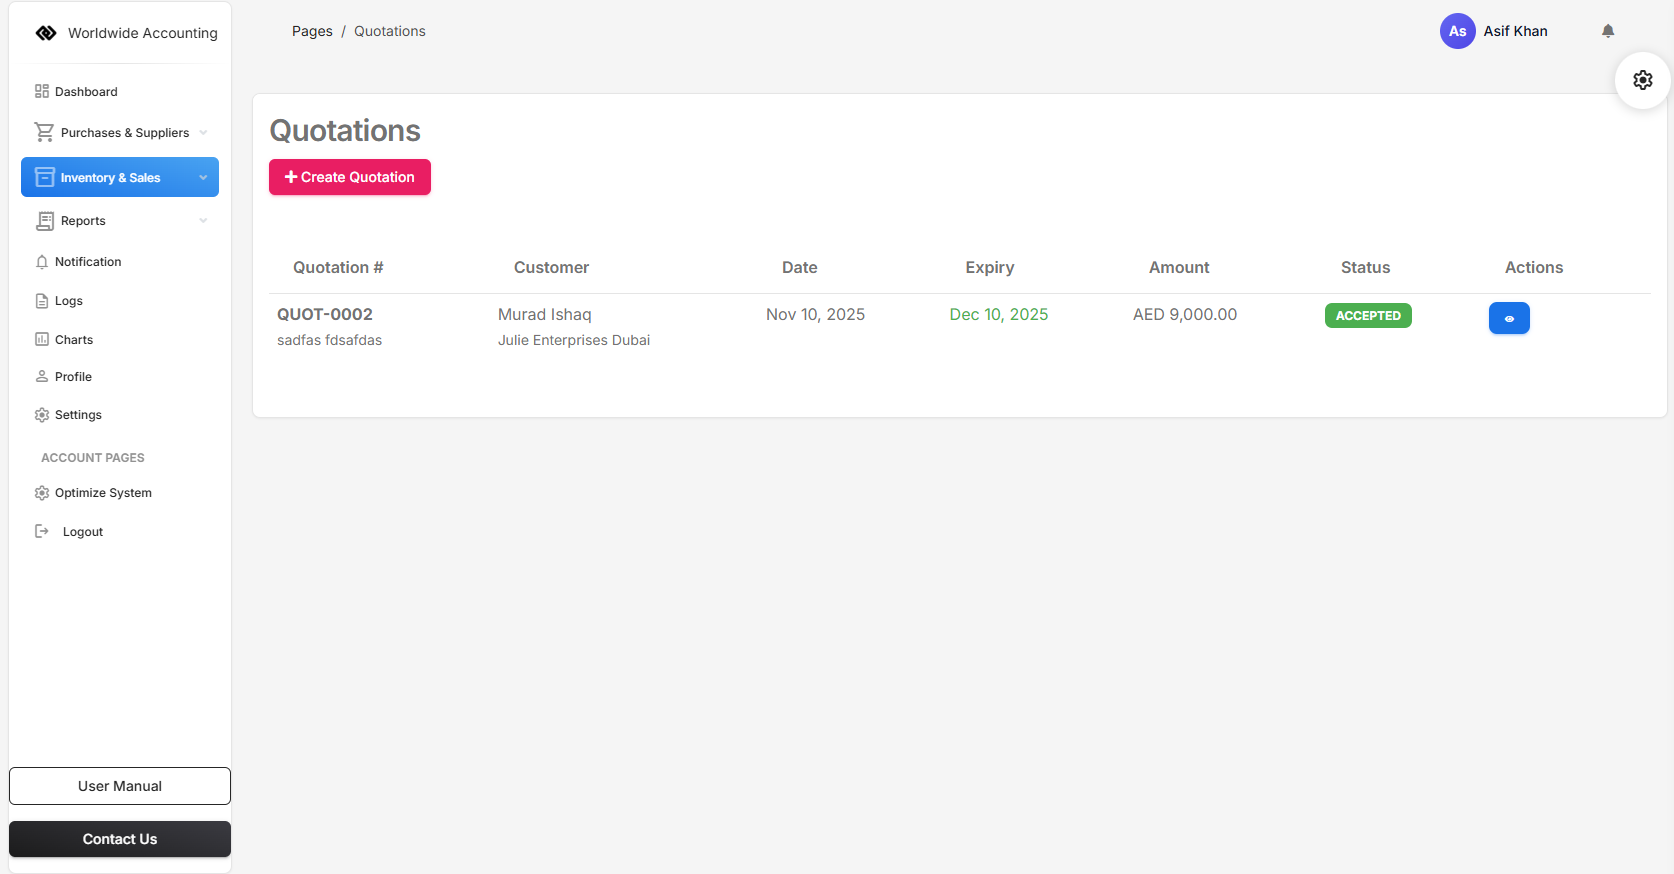
Quotations are professional price proposals sent to potential customers before they place an order. They outline products, services, prices, and terms, serving as a formal offer to do business.
Quotations help customers understand costs and make purchasing decisions. They can be converted to sales orders with one click when the customer approves, saving time and ensuring accuracy.
Key Features:
- Create professional quotation documents
- Set validity periods for quotes
- Include terms and conditions
- Convert approved quotes to sales orders
- Track quotation status (Draft, Sent, Accepted, Rejected)
To create a quotation, go to Quotations and click "Create Quotation". Select the customer, add products with quantities and prices, set validity period, and save. You can then send the quotation to the customer via email or download as PDF.
Sales Orders represent confirmed customer requests for products or services. They track the entire order fulfillment process from receipt through delivery and invoicing.
Sales orders can be created directly or converted from approved quotations. They help manage order processing, inventory allocation, and delivery scheduling while providing visibility into order status.
Key Features:
- Process customer orders with multiple line items
- Track order status (Pending, Processing, Shipped, Delivered, Cancelled)
- Manage delivery dates and shipping information
- Convert to sales invoices upon fulfillment
- Allocate inventory to specific orders
To create a sales order, navigate to Sales Orders and click "Create Sales Order". Select the customer, add ordered products, set delivery dates, and save. You can track the order through various statuses until completion.

The Stock Management module provides comprehensive inventory control across multiple warehouses. It includes stock adjustments, movements tracking, and warehouse management to maintain accurate inventory records.
This module helps businesses track inventory levels, monitor stock movements, and manage multiple storage locations. It ensures inventory accuracy through adjustments and provides complete visibility into stock transactions.
Key Components:
- Stock Adjustments: Correct inventory counts and record discrepancies
- Stock Movements: Track all inventory transactions and movements
- Warehouses: Manage multiple storage locations and transfers
- Inventory Reports: Generate stock levels and movement reports
Access stock management features through the Stock Management menu. You can perform stock adjustments, view movement history, and manage warehouse locations from their respective sections.
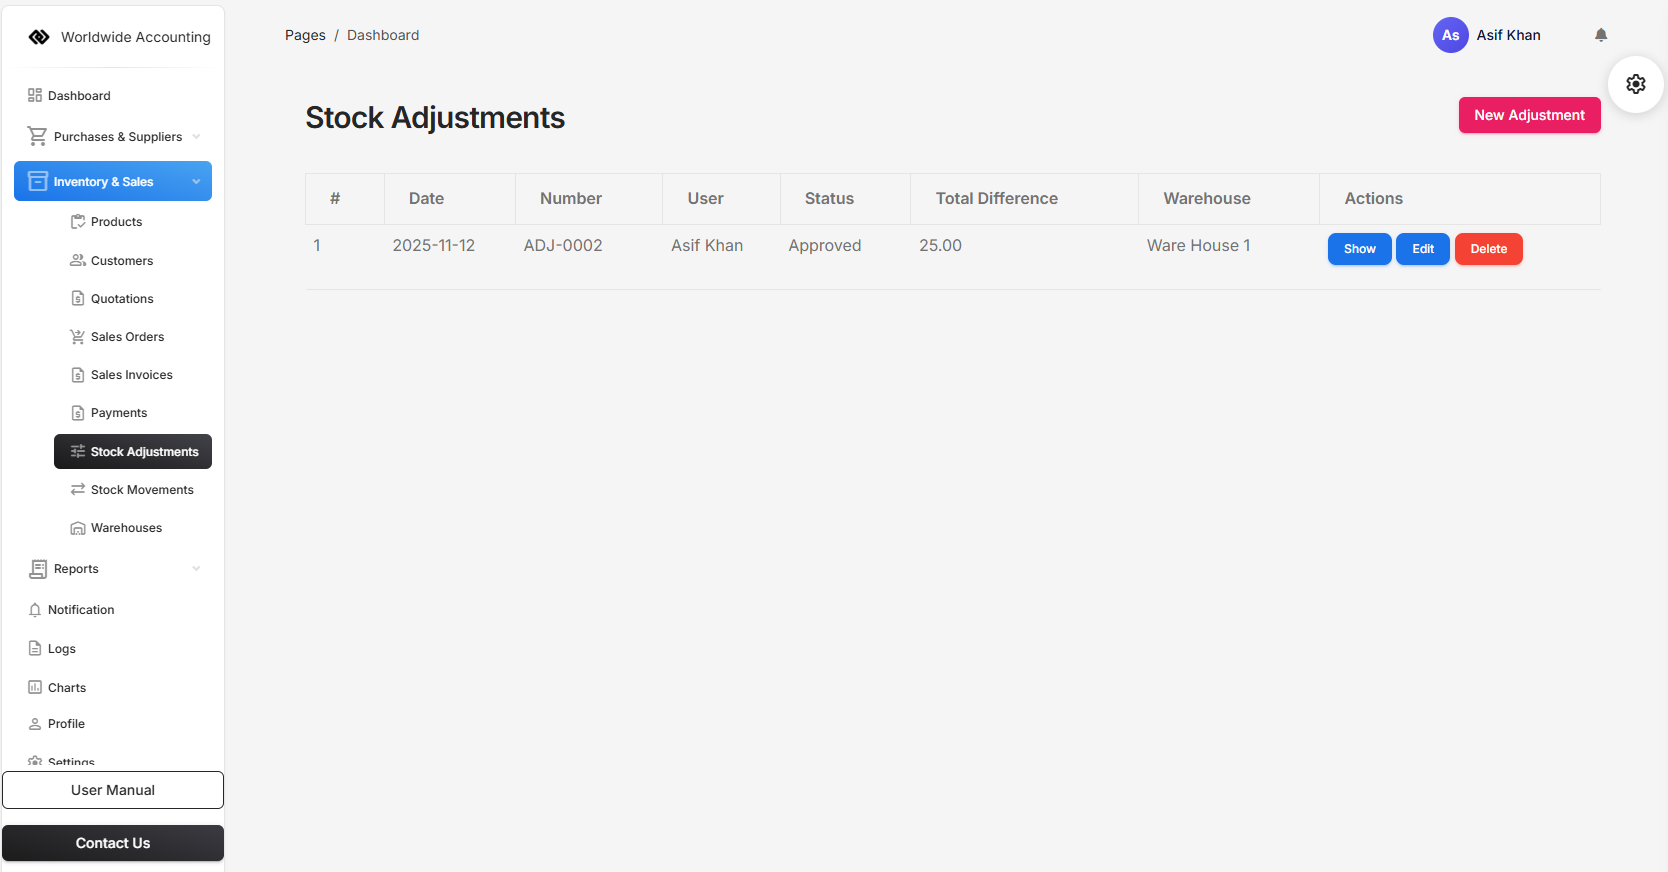
Stock Adjustments allow you to correct inventory counts when physical stock counts differ from system records. This ensures your inventory data remains accurate for reporting and decision-making.
Common reasons for adjustments include stock takes, damage, theft, or measurement errors. Each adjustment records the reason and adjusts the inventory value accordingly.
To make a stock adjustment, go to Stock Adjustments and click "New Adjustment". Select the warehouse, choose adjustment reason, add products with adjusted quantities, and save.
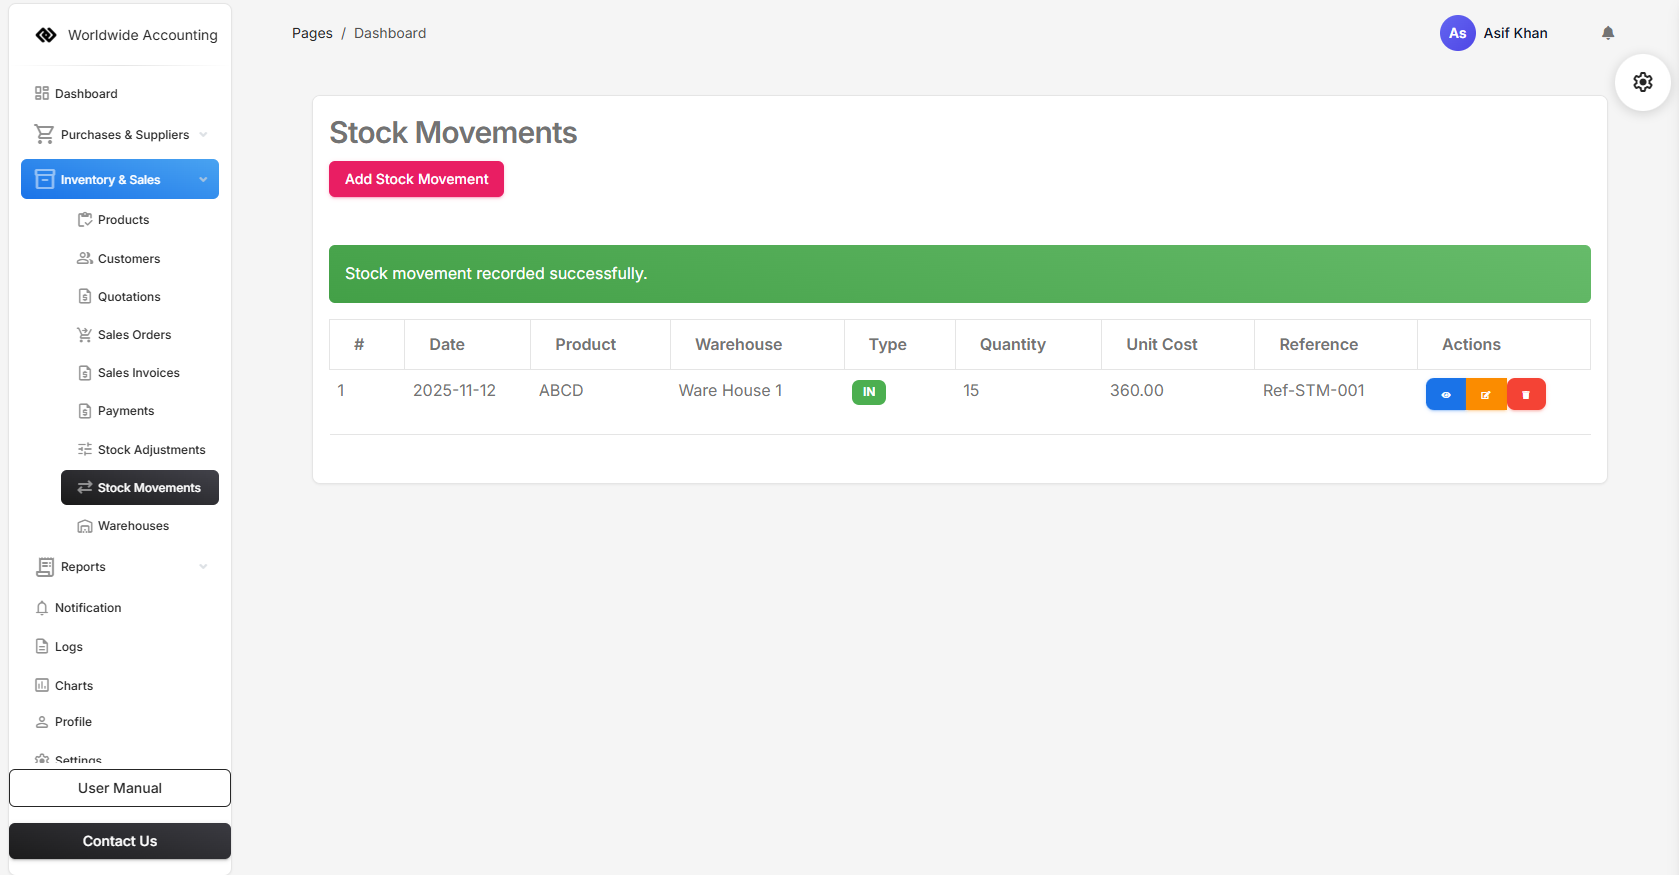
Stock Movements provide a complete audit trail of all inventory transactions. This includes purchases, sales, adjustments, and transfers between warehouses, giving you full visibility into inventory activity.
The movements history helps track when and why inventory levels changed, who made the changes, and what the impact was on stock quantities and values.
To view stock movements, navigate to Stock Movements. You can filter by date range, product, warehouse, or movement type to analyze specific inventory activities.
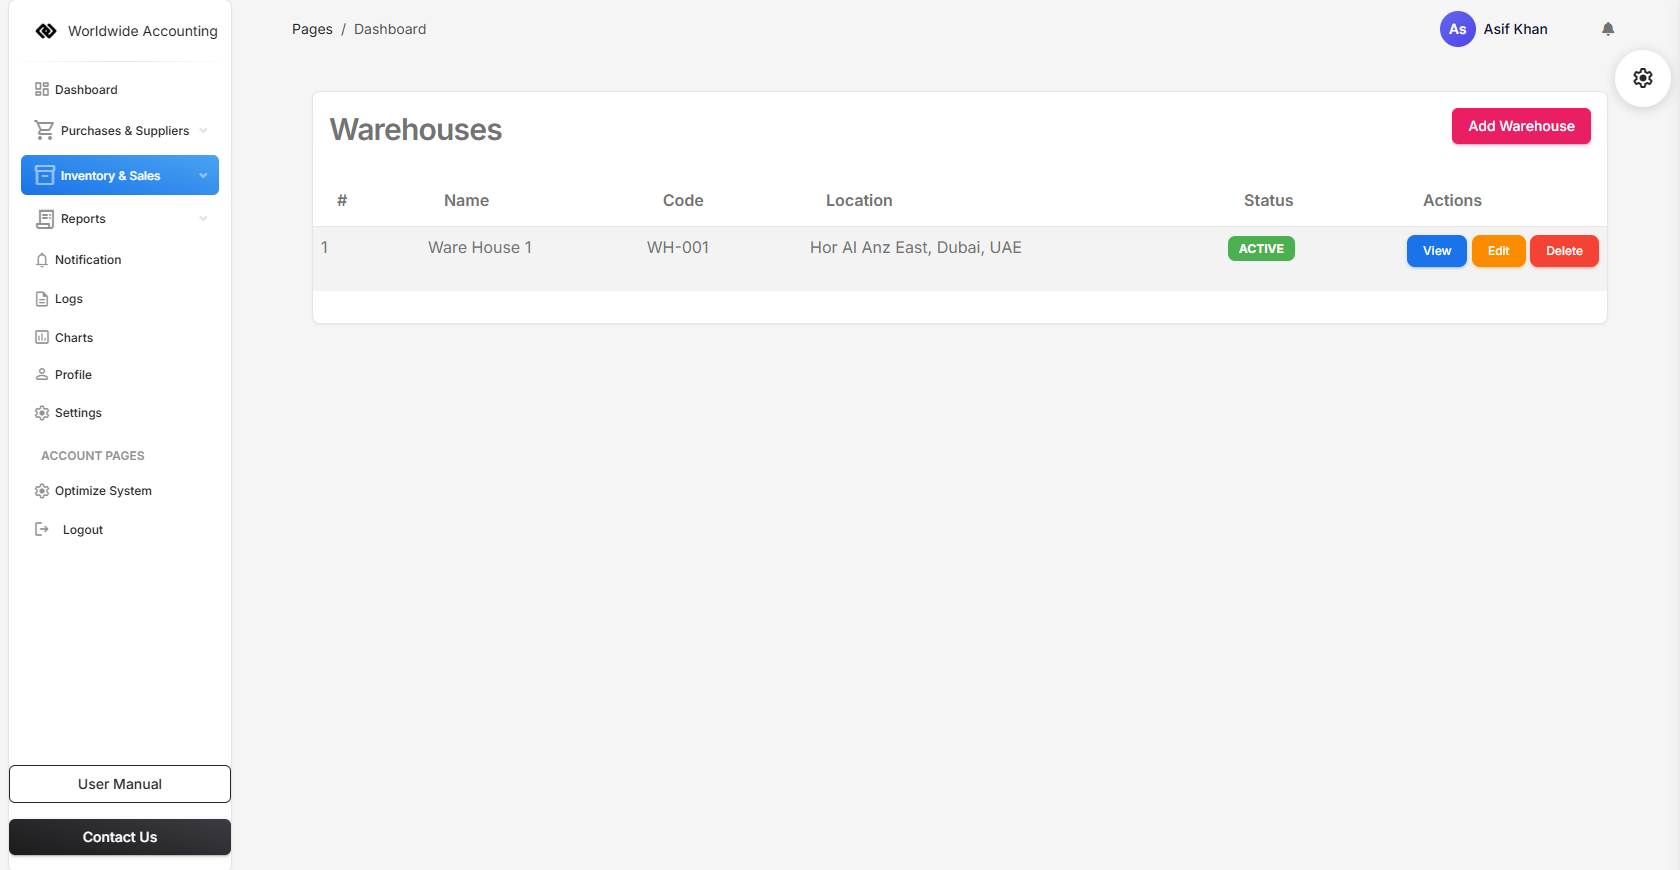
Warehouses allow you to manage multiple storage locations within your business. Each warehouse can have its own stock levels, manager, and address, providing detailed inventory tracking by location.
This feature is essential for businesses with multiple storage facilities, retail locations, or different departments that maintain separate inventory.
To manage warehouses, go to Warehouses and click "Add Warehouse" to create new locations. You can set warehouse details, assign managers, and track stock levels for each location separately.
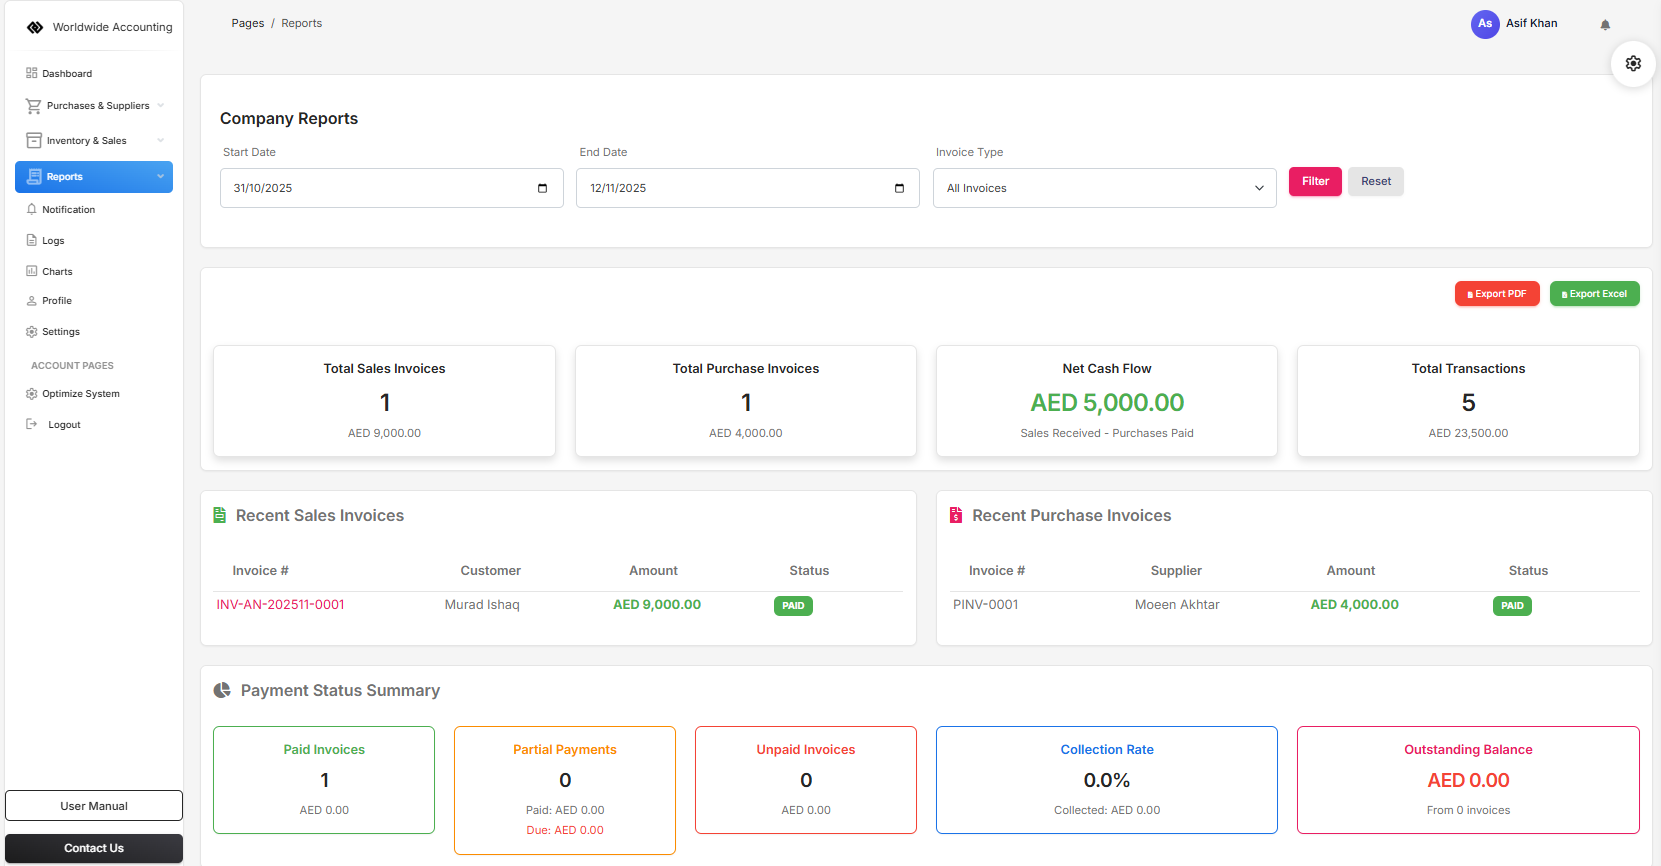
Company Reports provide a summarized overview of your financial data, highlighting key metrics, totals, and trends for a quick snapshot of your business health.
User can select all of the clients or can select the specific clients, and can specific date range to generate the report. and Finally user can Export the PDF and Excel sheet of Company Reports.
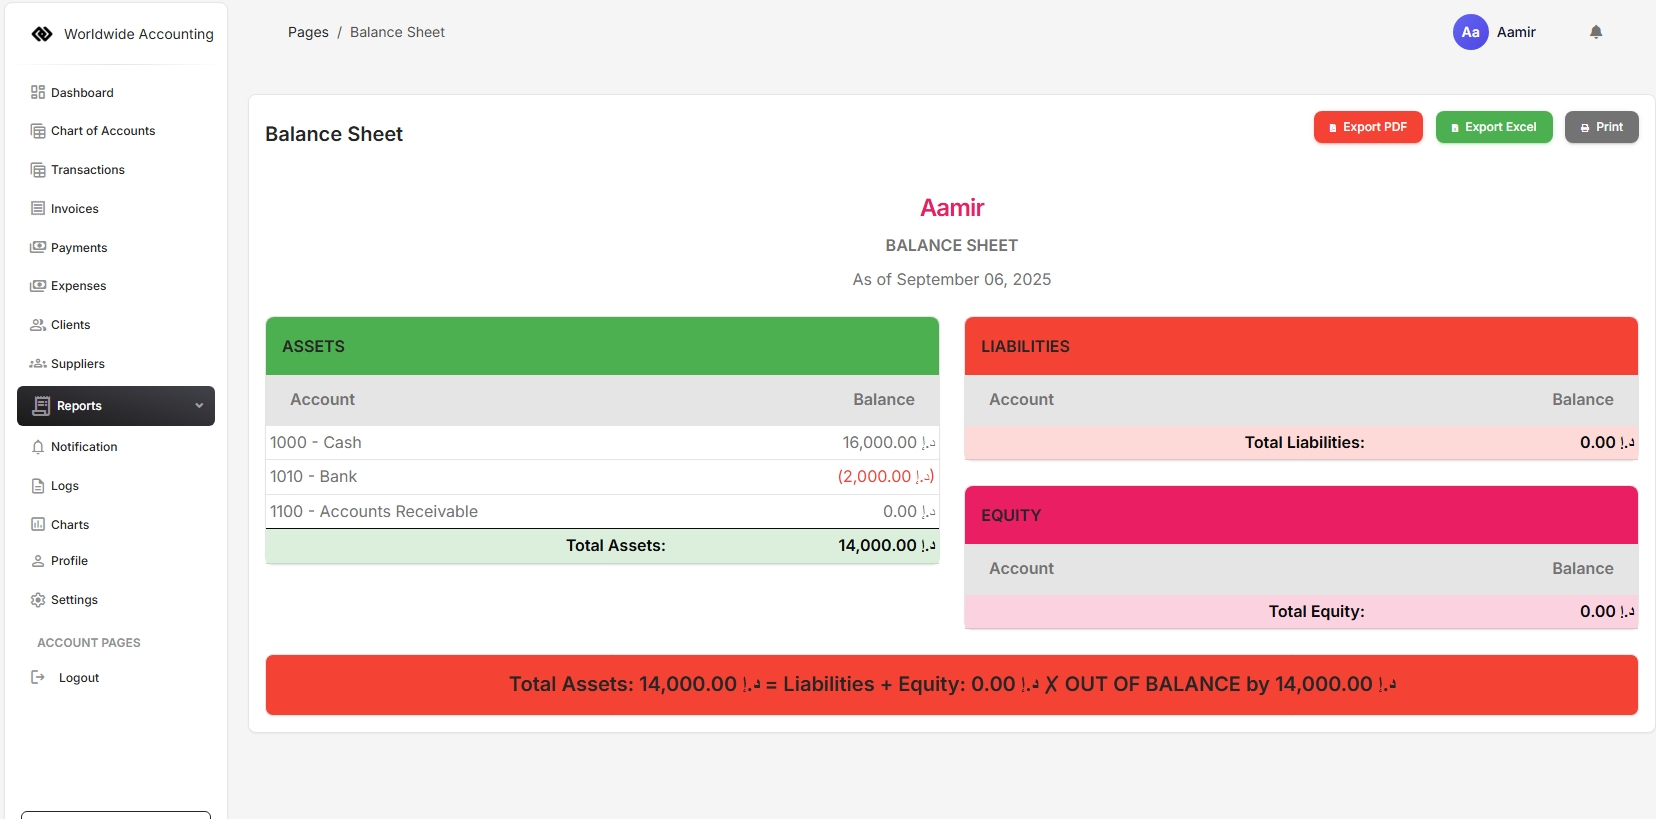
The Balance Sheet shows assets, liabilities, and equity at a specific date. It helps you understand what the company owns and owes, and is useful for evaluating financial stability.
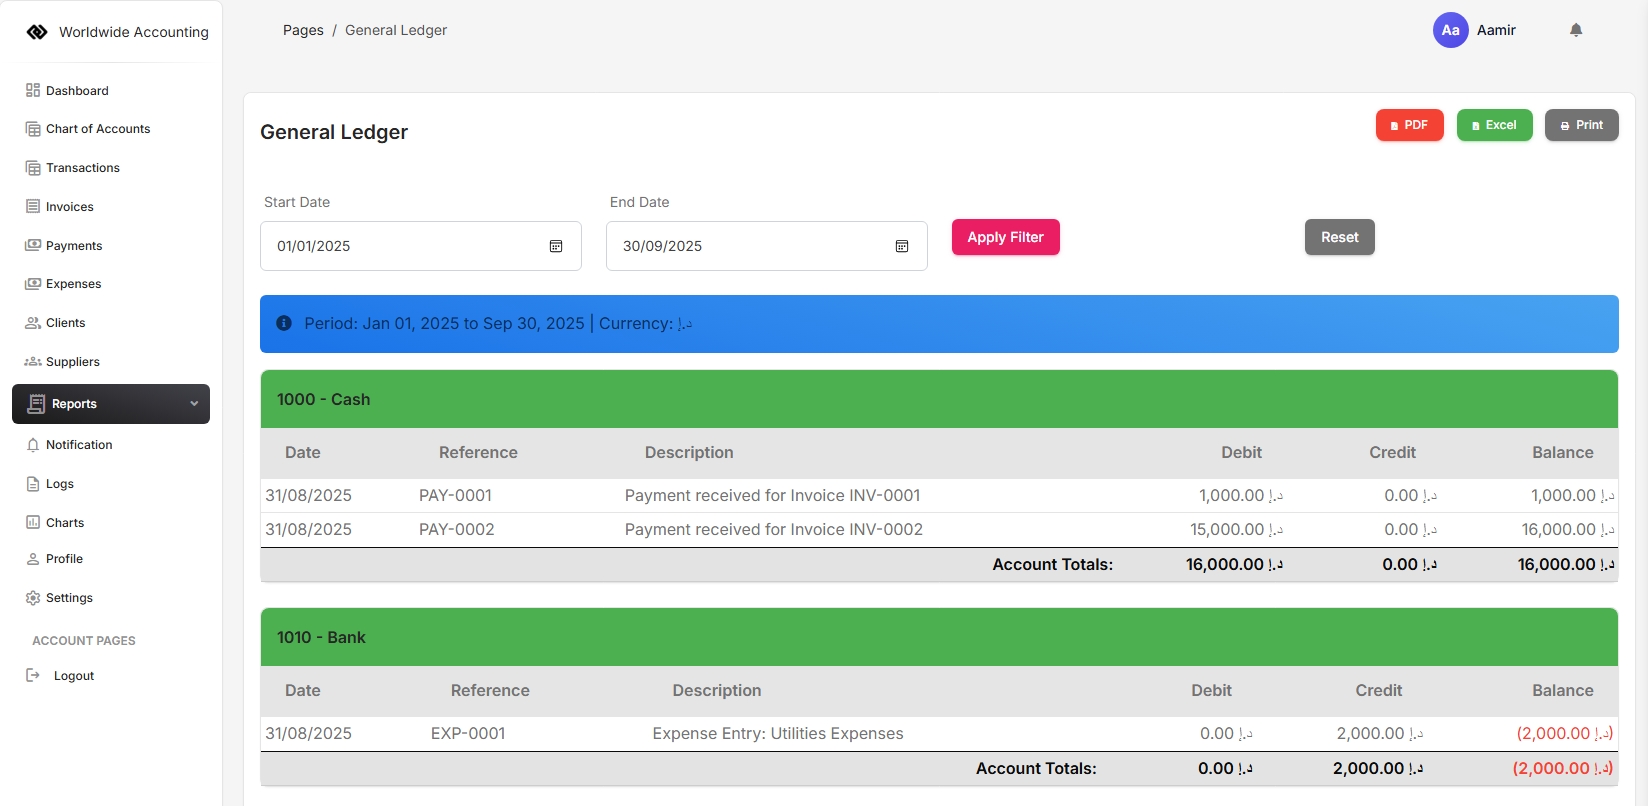
The Ledger Sheet contains detailed records of all transactions for each account. It tracks debits and credits, providing a complete account history for reconciliation and analysis.
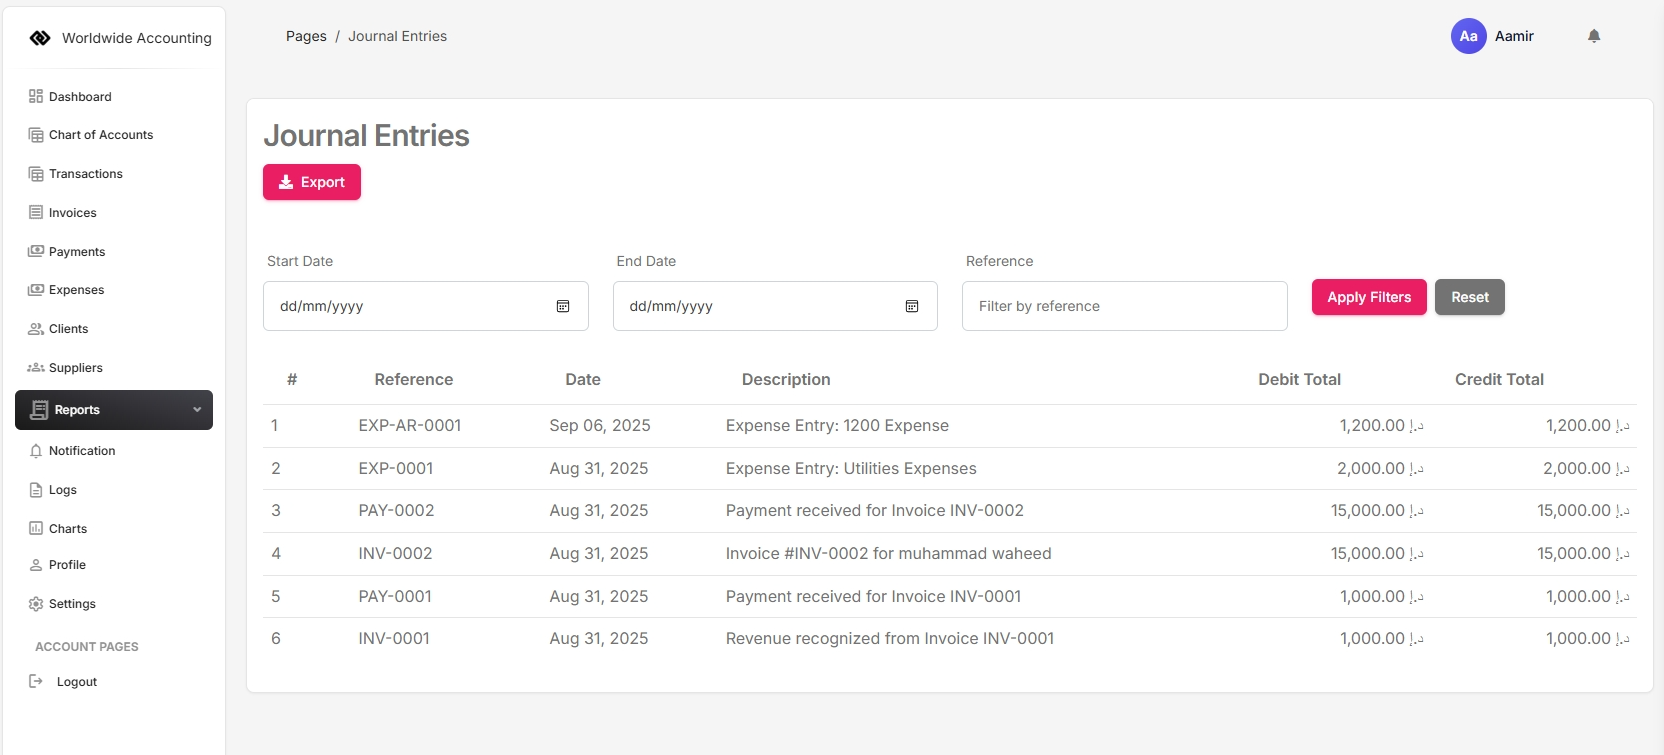
Journals display all journal entries including invoices, payments, expenses, and adjustments. They help verify transactions and trace how entries flow through accounts.
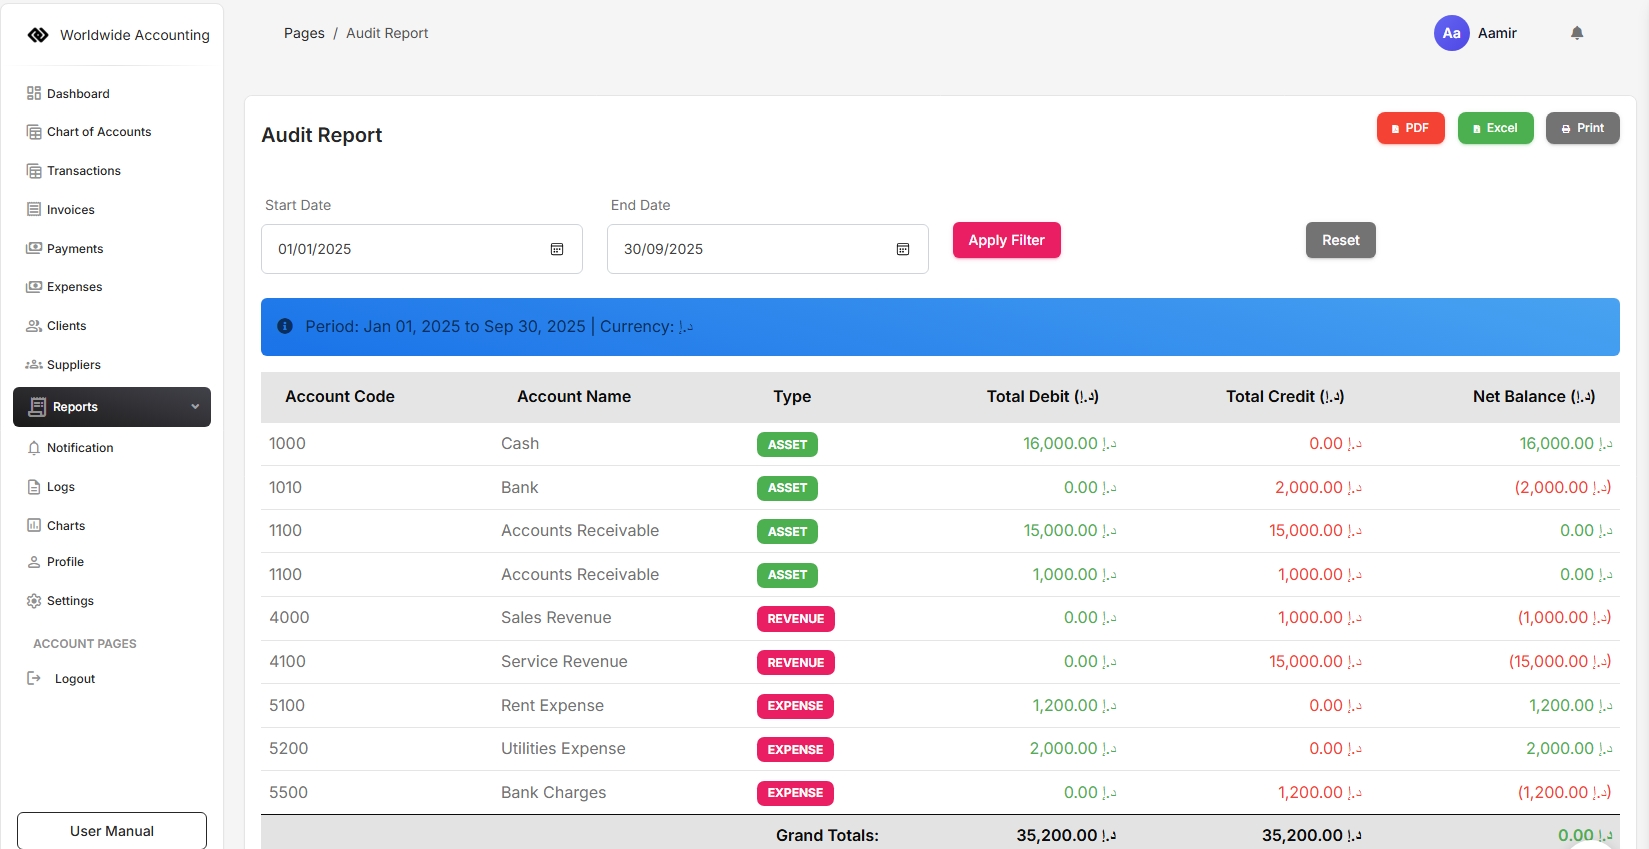
The Audit Report reviews financial records for compliance and accuracy. It identifies discrepancies, unusual activity, or unauthorized changes, ensuring transparency and accountability.
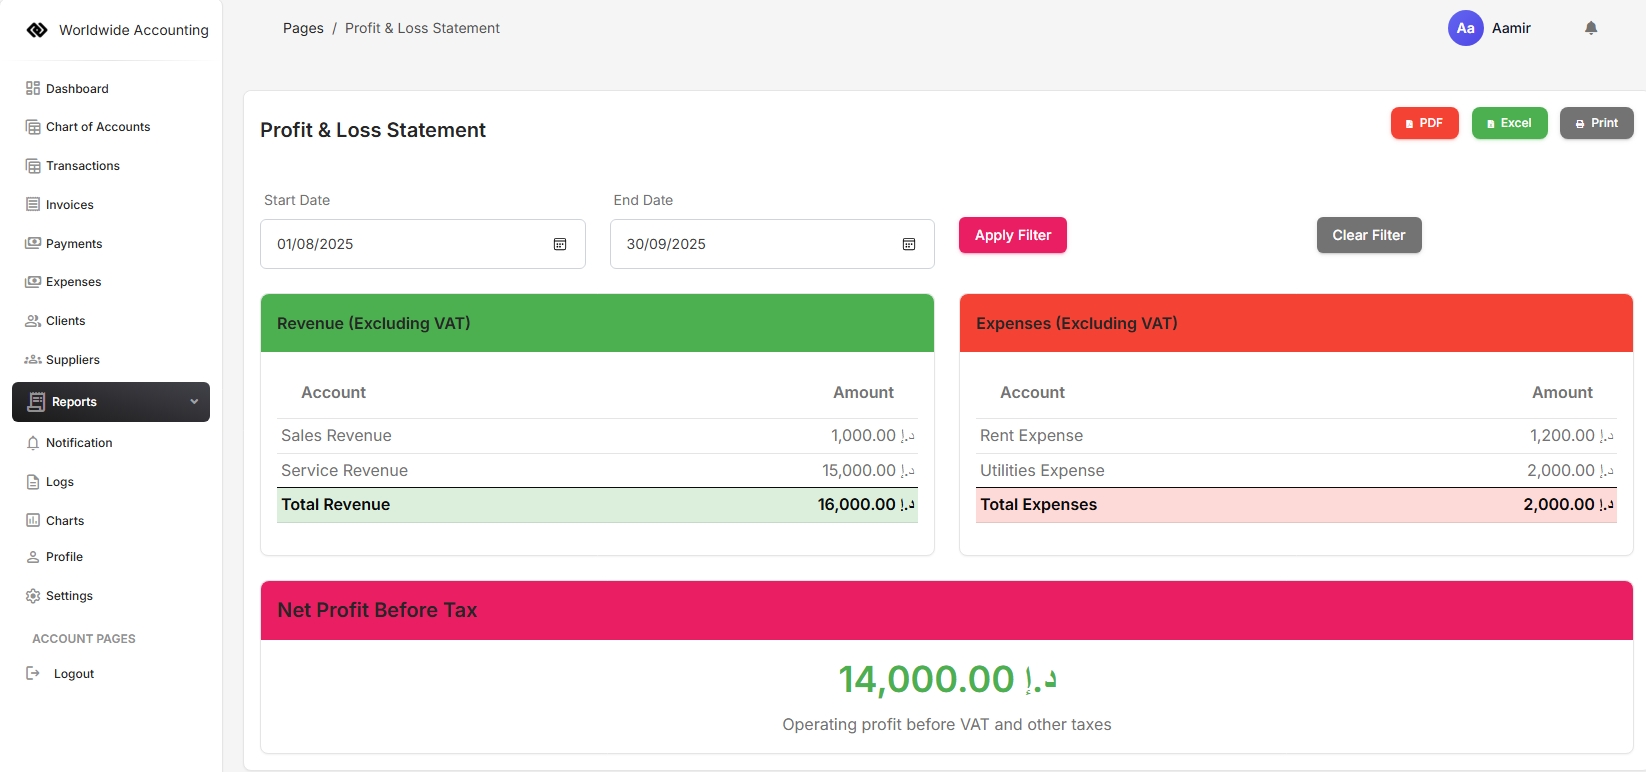
The Profit & Loss Report summarizes income, expenses, and net profit over a selected period. It helps analyze business performance, identify profitable areas, and monitor cost management.
User should make sure that date range is correctly selected. Then it will populate the report accordingly.
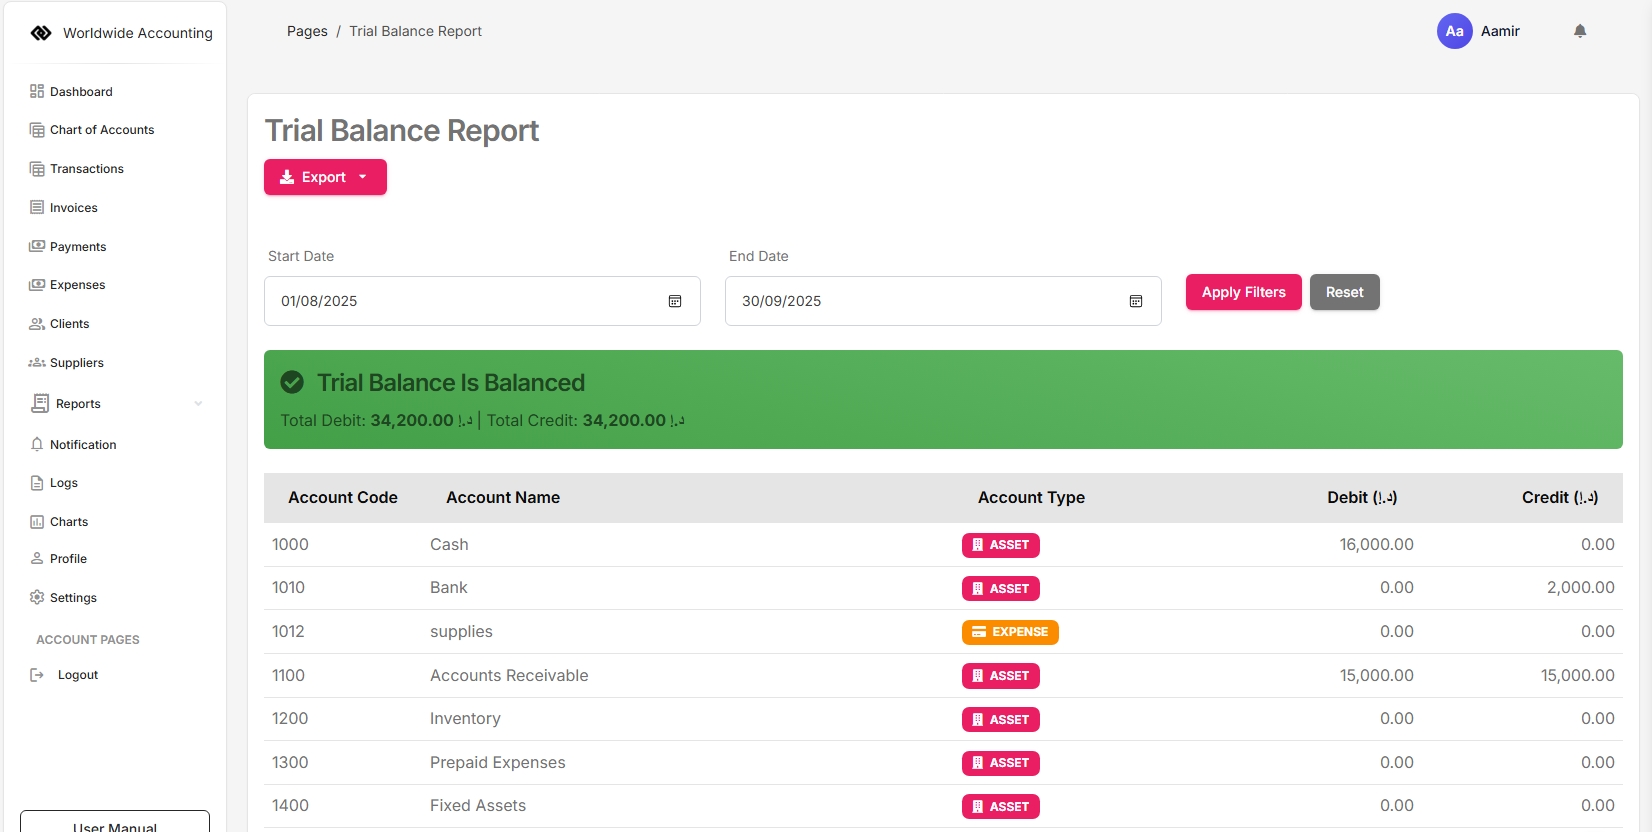
The Trial Balance lists all ledger account balances to ensure total debits equal total credits. It acts as a check before preparing financial statements like the Balance Sheet or Profit & Loss Report.
User should make sure that date range is correctly selected in Trial Balance Report. Then it will populate the report accordingly. Finally user can export PDF and Excel Sheet.
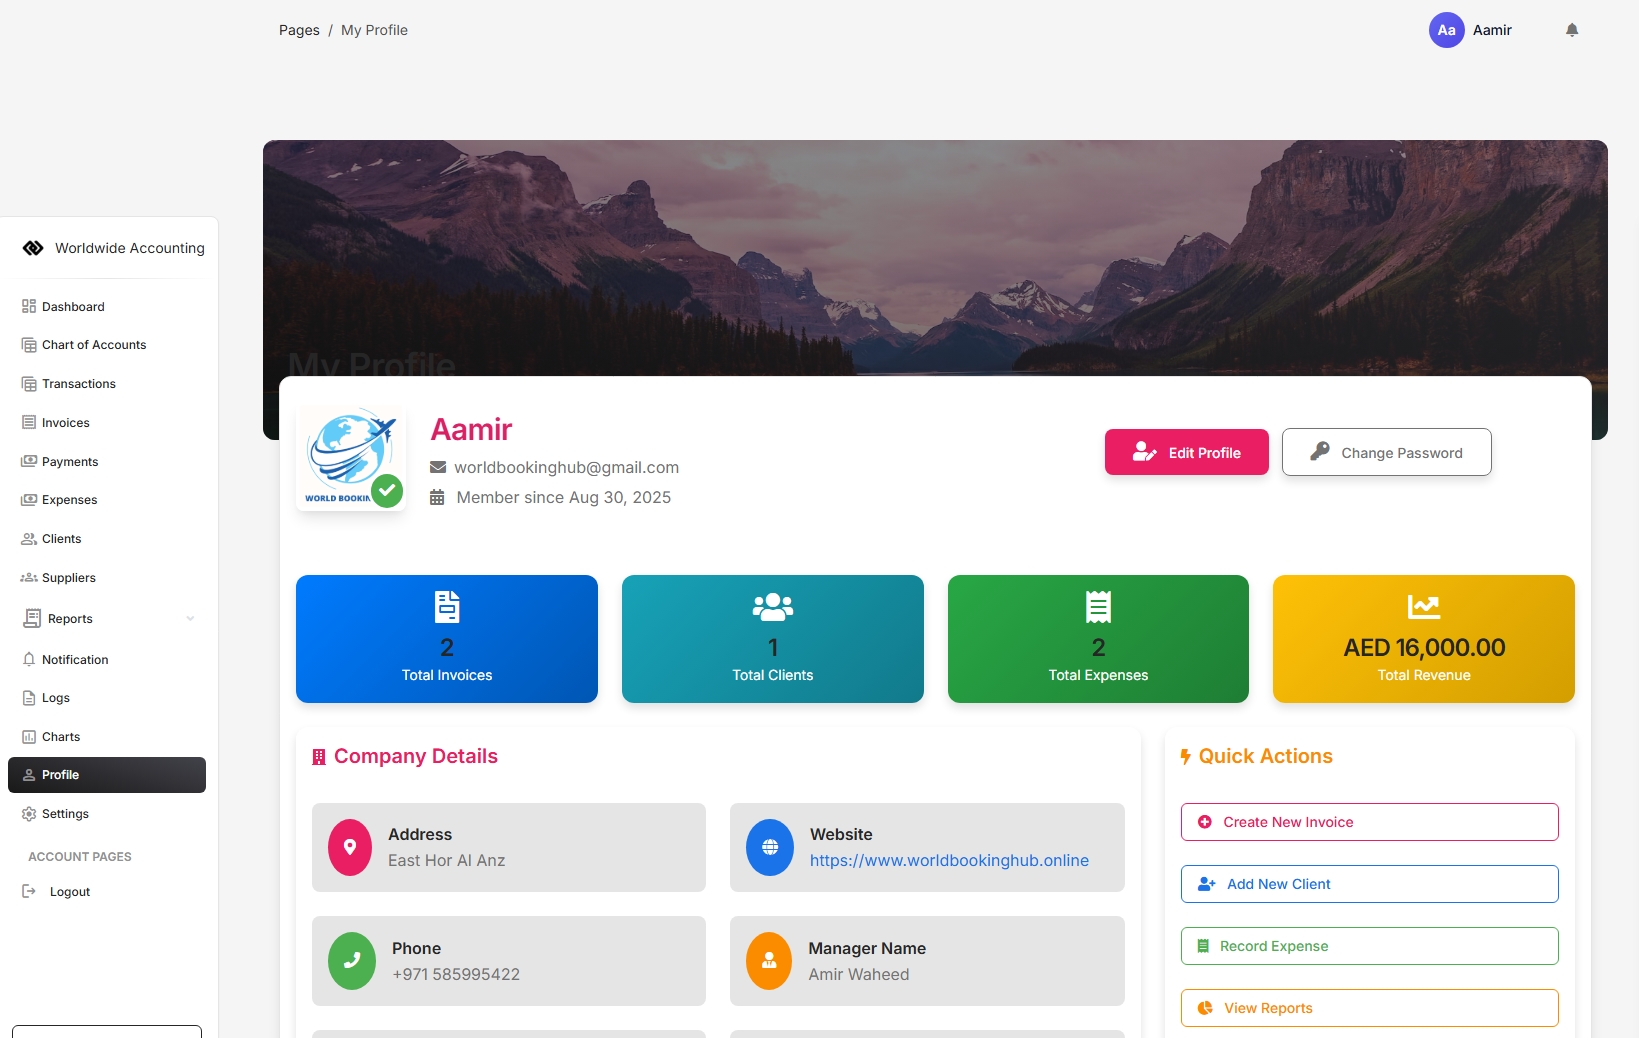
The Profile section serves as the central hub for managing your personal account and company information within the software. It provides a complete overview of your account activity, financial summaries, uploaded documents, and verification statuses.
Users can view and update membership information, track account activity, and ensure that essential details are accurate and up to date.
The financial summary offers a quick view of key metrics such as invoices, clients, expenses, and total revenue, enabling users to monitor the overall health and performance of their business at a glance.
The company information section allows users to manage contact details, website, manager information, orientation, and residency type. Maintaining accurate company details is important for reporting, communication, and regulatory compliance.
The document management area enables users to upload essential company or personal documents, track their verification status, and monitor which documents are pending, approved, or rejected. Initially the Documents verification will be pending, it will be reviewed by the administration and they will take the decision whether it should be approved or rejected.
Quick actions and status tracking provide easy access to account updates, email verification, and document approval monitoring. Users can quickly see the current status of their account and documents to ensure compliance and accuracy.
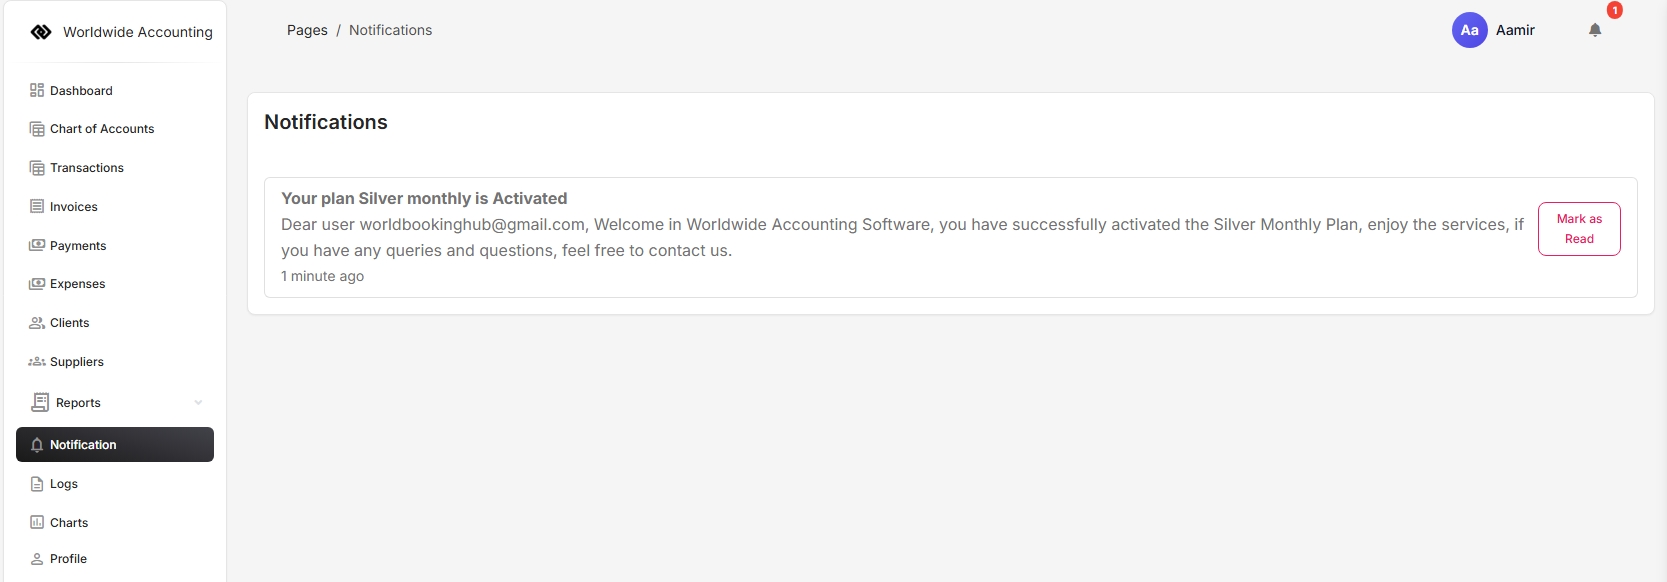
The Notifications feature allows the super admin to communicate important updates, alerts, or reminders directly to company users. This ensures users stay informed about system events, updates, or actions they need to take.
Super admins can create and send notifications to individual users, groups of users, or all companies. Notifications can include system updates, subscription reminders, document verification alerts, or other important messages. The admin controls the content, audience, and timing of each notification.
Company users can view all received notifications in their dashboard. They can read detailed messages, stay up to date with important alerts, and mark notifications as read to track which messages have been acknowledged.
This feature ensures timely communication between the super admin and company users, helping users respond promptly to important actions and updates.
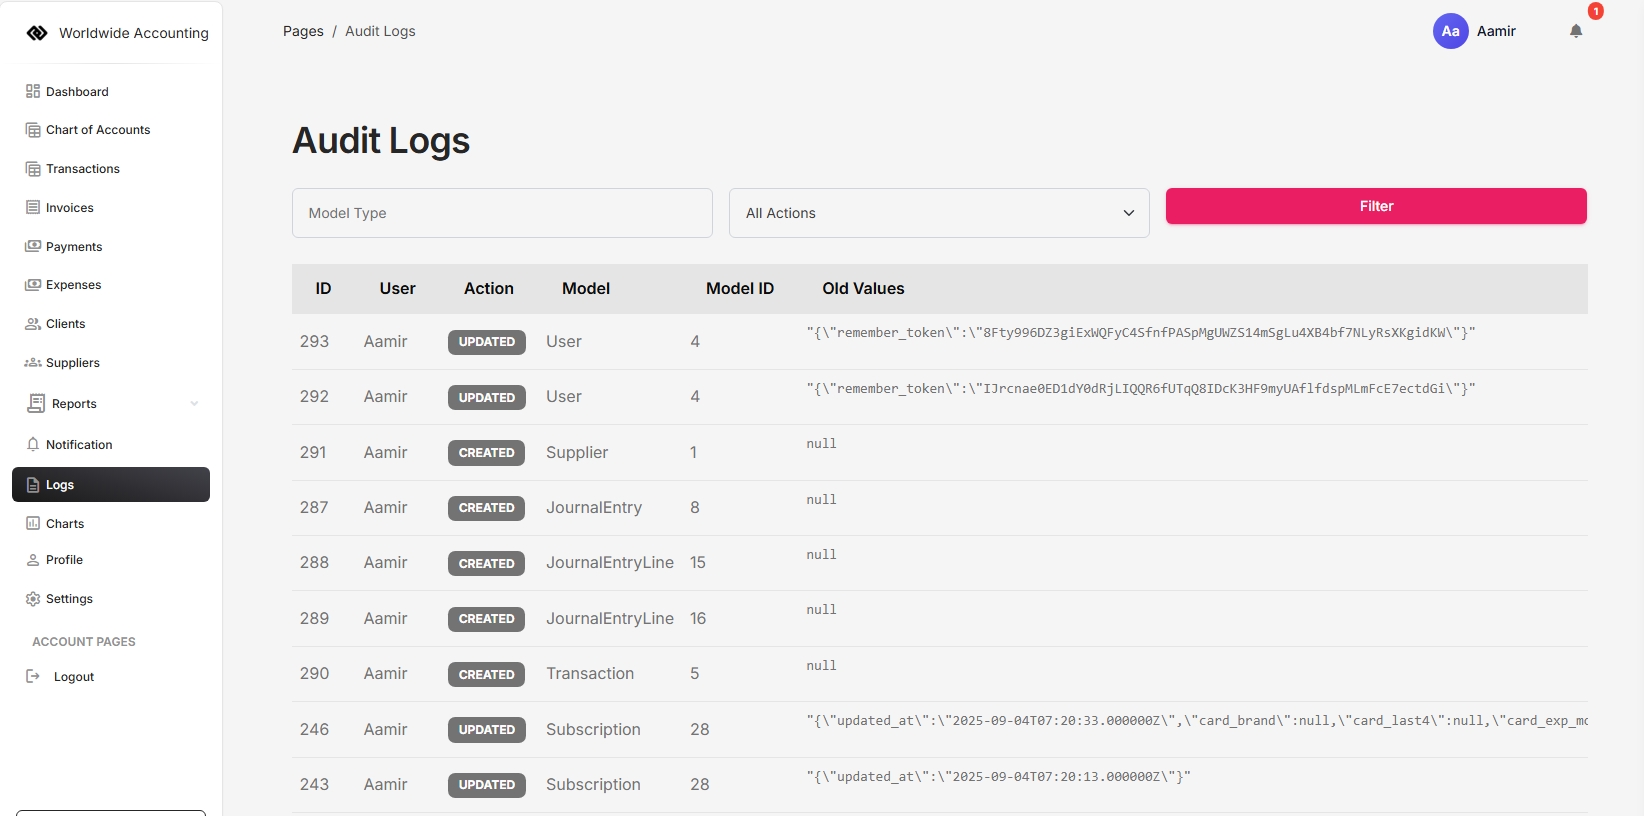
The Logs feature provides a detailed record of all activities and actions performed within the accounting software. It helps track changes, monitor user activity, and maintain transparency in the system.
Logs record events such as invoice creation, expense entries, updates to company details, user login activity, and changes made by administrators. This ensures accountability by keeping a traceable history of actions performed.
Company users can review logs to understand recent activity within their account, while super admins can monitor logs across all companies for auditing and compliance purposes.
By providing a transparent view of system usage, the Logs feature supports better security, control, and trust in the accounting software.
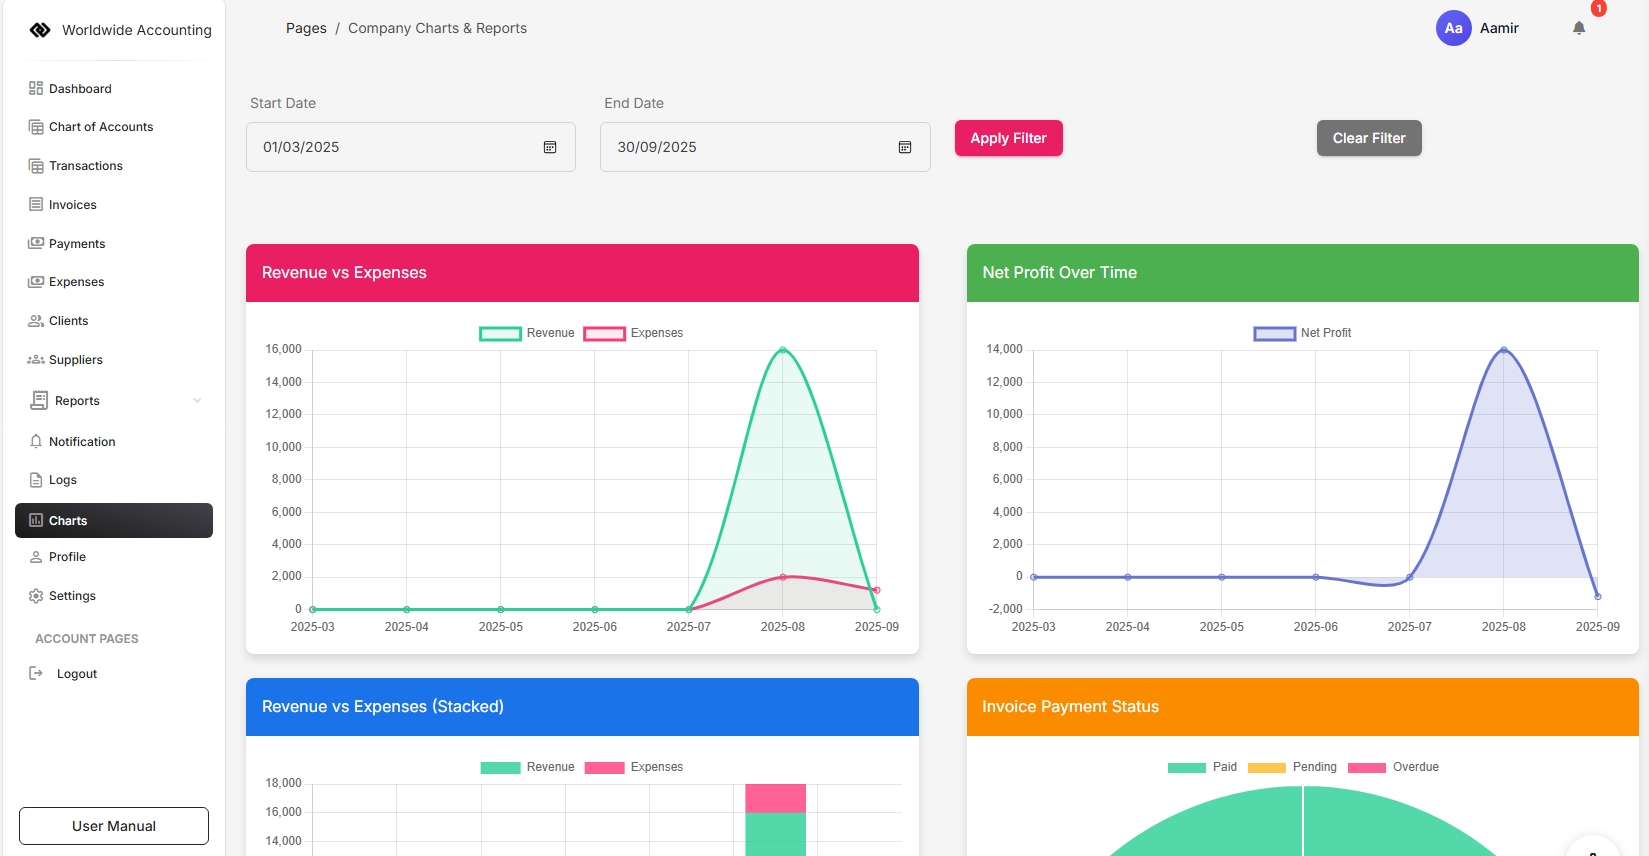
The Charts feature provides a visual representation of your company’s financial data. Instead of going through tables and reports, charts make it easier to quickly understand business performance and financial trends.
Common charts include revenue vs. expenses, profit breakdown, client activity, and category-based expense distributions. These visuals help identify patterns, track growth, and highlight areas that may need attention.
Company users can view charts to analyze their own business data, while super admins can access charts across companies to compare and monitor overall performance.
With clear and interactive financial charts, users can make smarter decisions, improve planning, and maintain better control over their business finances.
Get Help
Reach out to our support team for assistance with any issues.